
Croissants are a beloved pastry known for their flaky, buttery layers and irresistible aroma. If you’ve ever wondered how to make the best croissant recipe at home, you’re in the right place! This easy-to-follow guide will show you how to bake croissants that are crisp on the outside and soft on the inside, with the perfect layers that melt in your mouth. The key to success lies in using high-quality ingredients and mastering the right technique.
This best croissant recipe is designed to be buttery, flaky, and easy to follow, ensuring that even beginner bakers can achieve bakery-quality results. With just a few simple ingredients and step-by-step guidance, you’ll master the art of laminated dough and create croissants that rival the finest patisseries.
The key to making the best homemade croissants lies in using high-quality ingredients and following precise techniques like proper proofing and layering the dough with butter. By taking the time to get it right, you’ll be rewarded with delicate, airy layers and a rich, buttery taste that’s simply irresistible. Ready to get started? Let’s dive into the details!
What Makes the Best Croissant Recipe So Special?
The Secret to Buttery and Flaky Croissants
Achieving the perfect croissant requires mastering the balance between butter, dough, and technique. The hallmark of a great croissant is its crispy, golden exterior that gives way to soft, airy, and well-defined layers inside. Here’s how you can ensure your croissants turn out buttery, flaky, and delicious every time.
1. High-Quality Butter is Non-Negotiable
The key to a rich, buttery flavor starts with using the right butter. Not all butter is created equal, and for the best croissants, you should opt for:
- European-style butter (82% or higher fat content) for a richer taste and better lamination.
- Unsalted butter to control the salt levels in your dough.
- Cold butter for lamination to prevent it from melting into the dough.
Using a lower-fat butter can result in less flakiness and a denser texture, as it contains more water, which interferes with the layering process.
2. The Art of Laminating the Dough
Lamination is the process of folding and rolling butter into the dough to create ultra-thin layers. When baked, these layers puff up, giving croissants their iconic flaky texture. To get this right:
- Chill your dough and butter between each fold to maintain clean layers.
- Roll gently and evenly to prevent the butter from breaking through.
- Use the letter-fold technique (3-folds method) to maximize the number of layers.
If the butter melts into the dough, your croissants will lose their distinct, airy layers and become more bread-like instead of flaky.
3. Proofing at the Right Temperature
Proper proofing (the process of allowing the dough to rise) is crucial for achieving a light, airy croissant. Here’s how to do it correctly:
- Proof at a warm, but not too hot temperature (75-80°F/24-27°C) to prevent the butter from melting.
- Give the dough enough time—croissants need a slow, final proofing to develop their signature texture.
- Perform the “jiggle test”—when gently shaken, the croissants should slightly wobble, indicating they are proofed and ready for baking.
Skipping or rushing the proofing stage can lead to dense, underdeveloped croissants rather than the flaky, buttery layers you’re aiming for.
4. Baking for the Perfect Texture
Even if you’ve laminated and proofed correctly, the baking stage can make or break your croissants. Follow these steps to ensure a perfect bake:
- Preheat your oven properly to ensure even heat distribution.
- Use an egg wash (beaten egg with a splash of milk) to achieve a shiny, golden-brown crust.
- Bake at 375-400°F (190-200°C) for 18-22 minutes, until golden and crisp.
- Let them cool before serving—this allows the layers to fully set and develop their flaky texture.
By mastering these secrets, you’ll be able to create croissants that are buttery, flaky, and irresistible—just like those from a French bakery!
Why This is the Best Croissant Recipe for Home Bakers
Making croissants at home can seem intimidating, but with the right approach, you don’t need to be a professional pastry chef to achieve bakery-quality results. This recipe is designed with home bakers in mind, ensuring that the process is simple, achievable, and delivers consistently delicious results. Here’s why this is the best croissant recipe for anyone making croissants in their own kitchen.
1. Step-by-Step, Foolproof Instructions
One of the biggest challenges home bakers face with croissants is understanding each step of the process. This recipe is broken down into clear, easy-to-follow instructions, ensuring that even beginners can succeed. Each stage—mixing, laminating, proofing, and baking—is explained in detail, removing the guesswork.
What makes the process easy?
- Simple, clear directions with step-by-step guidance.
- Common mistakes and troubleshooting tips to help avoid errors.
- Visual cues to help bakers recognize the correct dough texture and proofing state.
This ensures that even if it’s your first time making croissants, you’ll be set up for success!
2. Uses Easy-to-Find Ingredients
Some croissant recipes call for specialized flours or hard-to-find ingredients, but this one keeps it simple. You likely already have most of the ingredients in your kitchen!
Key Ingredients for This Croissant Recipe:
- All-purpose or bread flour – No need for specialty flours.
- Active dry or instant yeast – Readily available in any grocery store.
- Unsalted butter – High-quality butter is recommended but not hard to find.
- Milk, sugar, salt, and eggs – Basic pantry staples.
By keeping the ingredient list accessible, home bakers can focus on perfecting their technique without hunting for rare ingredients.
3. Adaptable for Different Kitchen Setups
Unlike professional bakeries, home kitchens often lack specialized equipment like dough sheeters, proofing chambers, or commercial ovens. This recipe is adapted for home environments, so you can successfully make croissants without fancy tools.
How this recipe works in any home kitchen:
- Rolling pin instead of a dough sheeter – Teaches you how to roll and fold manually.
- Room-temperature proofing – No need for a commercial proofing box.
- Standard oven baking – Works in regular home ovens without special settings.
This ensures that anyone with basic baking tools can follow the recipe and get great results.
4. Time-Saving and Make-Ahead Options
Croissants take time to make, but this recipe provides time-saving tricks and make-ahead options to fit into busy schedules.
How This Recipe Saves Time for Home Bakers:
- Overnight Dough Resting: The dough can be prepared a day in advance and refrigerated.
- Freezer-Friendly: Shaped croissants can be frozen and baked fresh when needed.
- Efficient Proofing Tips: Tricks to speed up the proofing process without compromising quality.
These time-saving options make it easy to plan ahead, so you don’t have to spend an entire day making croissants.
5. Produces Bakery-Quality Croissants at Home
At the end of the day, the most important reason this is the best croissant recipe for home bakers is that it delivers flaky, buttery, and authentic croissants—without requiring professional experience.
What Makes These Croissants So Good?
Delicate, airy layers thanks to the lamination process.
Rich, buttery flavor with the perfect balance of crispness and softness.
Golden, glossy finish just like in a French bakery.
This recipe makes it possible to enjoy fresh, homemade croissants that taste just as good (if not better) than store-bought ones—all from the comfort of your kitchen!
Final Thoughts
Many home bakers are intimidated by croissants, but this recipe takes the fear out of the process. With clear instructions, accessible ingredients, home-friendly techniques, and bakery-quality results, it’s the perfect way to bring the magic of French pastries into your own home.
Learn more about the unique qualities that make the best croissant recipe stand out from the rest. For a deeper dive into pastry baking, check out this expert guide on making perfect laminated dough for all your baking needs.
Are you ready to bake the best croissants you’ve ever had? Let’s get started!
Perfecting the Technique
Making croissants is as much about precision and technique as it is about high-quality ingredients. To achieve the flaky, buttery layers and soft, airy interior that define the perfect croissant, you need to pay close attention to key steps in the process. Let’s break down the essential techniques that will take your croissants from good to truly bakery-quality.
1. Mastering the Dough Consistency
The foundation of a great croissant starts with a properly prepared dough. The dough should be soft yet elastic, allowing it to roll out smoothly without tearing.
Key Tips for Dough Preparation:
- Use cold ingredients – Keep milk, water, and butter cold to prevent premature fermentation.
- Don’t over-knead – The dough should be mixed until smooth but not overworked, as too much gluten development can make rolling difficult.
- Rest the dough properly – After mixing, the dough needs to rest in the fridge for at least 4–6 hours or overnight to develop flavor and structure.
Proper dough consistency makes the lamination process easier and ensures that your croissants turn out light, airy, and easy to shape.
2. Laminating the Dough for Perfect Layers
Lamination is the process of folding and rolling butter into the dough to create multiple layers. This is what gives croissants their signature flakiness.
How to Perfect the Laminating Process:
- Keep the butter and dough at the same temperature – Both should be cold but pliable to ensure even layering. If the butter is too hard, it will break inside the dough; if too soft, it will seep into the dough instead of creating layers.
- Roll evenly – Use a light but firm touch to prevent the butter from shifting inside the dough. Roll from the center outward in all directions, ensuring an even thickness.
- Use the correct folding technique – The three-fold method (letter fold) is the best for home bakers. This involves rolling out the dough and folding it into thirds, repeating this process three times for a total of 27 layers.
- Chill between folds – After each fold, refrigerate the dough for at least 30 minutes. This keeps the butter firm and prevents melting, which could ruin the layers.
Common Lamination Mistakes to Avoid:
- Rolling too aggressively can cause the butter to break into pieces.
- Skipping chilling time leads to butter melting into the dough, resulting in dense croissants.
- Uneven rolling can cause thin spots where butter seeps out, leading to uneven layers.
Mastering lamination is essential for achieving the crisp, airy texture of a perfect croissant.
3. Shaping Croissants Like a Pro
Once the dough is laminated, it’s time to cut, roll, and shape the croissants.
Step-by-Step Guide to Shaping Croissants:
- Roll out the dough evenly – Aim for about ¼-inch (5mm) thickness.
- Cut perfect triangles – Each croissant should start as a long, narrow triangle (about 3 inches wide at the base and 8 inches long).
- Stretch before rolling – Gently stretch the triangle slightly before rolling to create longer, more elegant layers.
- Roll tightly but not too tight – Begin at the wide base and roll towards the tip, making sure not to press too hard so the layers don’t collapse.
- Place with tip down on baking sheet – This prevents the croissant from unrolling during baking.
Pro Tip:
Leave space between croissants on the baking tray to allow for proper expansion while proofing and baking.
A well-shaped croissant will have a distinct swirl inside and puff up beautifully in the oven.
4. Proofing to Perfection
Proper proofing ensures that croissants rise fully and develop their airy texture before baking.
How to Proof Croissants the Right Way:
- Temperature matters – The ideal proofing temperature is 75–80°F (24–27°C). Too hot, and the butter melts; too cold, and the croissants won’t rise properly.
- Time it right – Croissants usually take 2–3 hours to proof. They should double in size and have a slight wobble when gently shaken.
- Humidity helps – Cover the croissants with lightly greased plastic wrap or a damp towel to prevent drying out.
Signs That Croissants Are Properly Proofed:
- They have visibly expanded but still hold their shape.
- The layers are distinct, and butter hasn’t melted.
- When gently shaken, the croissants jiggle slightly without deflating.
Avoid over-proofing. If they proof too long, the layers will collapse, and the croissants will bake up flat instead of puffy.
5. Baking for the Perfect Finish
Baking is the final and most crucial step in the croissant-making process.
How to Bake Croissants Like a Pro:
- Preheat the oven properly – Set the oven to 375–400°F (190–200°C) at least 20 minutes before baking to ensure even heat distribution.
- Use an egg wash – Brush croissants with a light egg wash (1 egg + 1 tbsp milk) to create a glossy, golden-brown crust.
- Bake until deeply golden – This usually takes 18–22 minutes, depending on your oven.
- Cool before serving – Freshly baked croissants need at least 10 minutes to cool, allowing the layers to fully set. Cutting into them too soon can cause them to collapse.
Final Thoughts
Perfecting croissant-making is all about technique, from handling the dough to laminating, proofing, and baking. While it may take some practice, once you master these steps, you’ll be able to create bakery-quality croissants in your own kitchen—flaky, buttery, and absolutely delicious!
Are you ready to put your skills to the test? Let’s get baking!
Ingredients and Tools You Need for the Best Croissant Recipe

Essential Ingredients for Flaky Croissants
Achieving flaky croissants requires a balance of ingredients that will give the dough both its structure and its signature buttery layers. The right ingredients not only affect the flavor but also influence the texture and consistency of the dough. Here’s an in-depth look at each ingredient that contributes to the perfect, flaky croissant.
Flour: The Foundation of Croissant Dough
Flour is the backbone of any pastry dough, and croissants are no exception. The type of flour you use plays a pivotal role in the dough’s texture and the flakiness of the croissants.
- All-Purpose Flour: For a delicate texture that isn’t too heavy, all-purpose flour is usually the go-to choice for croissants. It provides the right balance of strength and softness, ensuring your croissants maintain structure without becoming dense.
- Bread Flour: Some bakers prefer using bread flour, which has a higher protein content, to achieve a slightly firmer and chewier texture. Bread flour is also great for helping to trap air during the fermentation process, which can result in a light, airy croissant.
- Tip: To get the best results, use unbleached flour for a more natural flavor and better dough texture. Bread flour might be more ideal if you’re looking for a croissant that’s a bit heartier, while all-purpose flour will give you a lighter, more buttery texture.
Butter: The Key to Flakiness and Flavor
Butter is the single most important ingredient when it comes to making croissants. Not only does it contribute to the rich, buttery flavor, but it’s the secret to creating those delicious thin layers of flakiness that croissants are known for. The process of folding the dough with butter (called lamination) creates those delicate layers.
- High-Quality Butter: Always opt for high-fat, unsalted butter for your croissants. The fat content directly impacts the layers of the dough, as higher fat means the dough will be more tender and flaky. Butter with a fat content of 80-82% is ideal, as it provides the right balance of flavor and texture.
- European-Style Butter: For the best results, European-style butter is the top choice. It has a higher fat content than typical American butter, resulting in flakier and more delicate layers. The creaminess and flavor of European butter help create a more complex taste in your croissants.
- Cold Butter: The butter must be cold, especially during the lamination process. The cold temperature prevents the butter from melting into the dough too quickly, helping to maintain distinct layers that puff up beautifully as they bake.
Milk: Hydration and Softness
Milk adds moisture to the dough, helping to hydrate the flour and create a soft texture. Whole milk is the best choice for this recipe due to its higher fat content, which helps to enrich the dough and give the croissants a pillowy soft crumb. Milk also contributes a slight sweetness, balancing the rich flavors of the butter.
- Whole Milk: Using whole milk will give your dough the necessary softness and elasticity. It will also help to create a slightly sweeter dough, which enhances the overall flavor of the croissants.
- Milk’s Role in Fermentation: The sugar in milk can also promote yeast activation, which is important for the dough’s rise. A well-hydrated dough will also handle the rolling and folding process much more easily, giving you better results.
Yeast: The Secret to Lightness
Yeast is responsible for the dough’s rise, and for croissants, it’s crucial that the yeast is active to create a light, airy texture.
- Instant Yeast: While you can use active dry yeast, instant yeast is often preferred for this recipe because it doesn’t need to be dissolved in warm water beforehand, which speeds up the process. Instant yeast is convenient and provides a more consistent rise, especially for the delicate layers in croissant dough.
- Active Dry Yeast: If using active dry yeast, you’ll need to dissolve it in warm water (about 110°F / 43°C) before incorporating it into the dough. Make sure to give it time to activate.
- How Yeast Affects the Layers: The yeast works in tandem with the butter and the dough’s resting periods to create the air pockets that lead to a flaky texture. The slower the dough rises (especially if you give it a long rest overnight), the more distinct the layers will be.
Sugar: A Touch of Sweetness for Browning
While the sweetness of a croissant is minimal, sugar plays a critical role in enhancing the flavor and helping the croissants brown evenly in the oven.
- Small Amount of Sugar: A small amount of sugar (about 2 tablespoons) helps to activate the yeast while also contributing to the golden-brown crust that is characteristic of a perfectly baked croissant.
- Sugar’s Role in Crust Formation: As the croissants bake, the sugar caramelizes, creating a crispy and slightly sweet outer layer. This sweetness also balances out the richness of the butter inside.
Salt: Flavor Enhancer
Salt is a simple yet essential ingredient in the dough. While it’s often overlooked, salt plays a crucial role in bringing out the flavors of the butter and yeast.
- Balance of Sweetness and Salt: Salt balances the natural sweetness of the milk and butter, enhancing the overall flavor of the croissant dough. It also strengthens the dough structure, contributing to its elasticity and overall performance.
- Use Sea Salt: For the best flavor, use fine sea salt as it dissolves easily into the dough and doesn’t leave grainy bits behind.
Egg Wash: The Finishing Touch
An egg wash is optional, but it’s what gives croissants their shiny, golden finish that makes them irresistible.
- Egg Wash Ingredients: The typical egg wash is made with beaten egg and a splash of milk. This mixture is brushed onto the croissants just before baking to promote browning and give them a glossy, appealing look.
- Extra Shine: If you want extra shine, a splash of cream added to the egg wash can help create a more decadent finish.
Tips for Using These Ingredients Effectively
- Use cold butter and cold water for lamination to prevent the butter from melting into the dough.
- Rest the dough properly between folds to allow the gluten to relax and ensure the dough is easy to work with.
- Don’t skip the chilling steps — the dough needs time to rest in the fridge to develop flavor and prevent overworking, which would make the croissants tough.
With these carefully selected ingredients, you’ll be able to create flaky, buttery croissants that are sure to impress. Whether you’re a beginner or a seasoned baker, the combination of high-quality flour, butter, yeast, and a few other key elements will guide you toward perfection.
Must-Have Tools for Making the Best Croissants
Making croissants at home can feel like a complex process, but with the right tools, the journey becomes easier, more efficient, and ensures better results. Each tool plays a role in helping you achieve the ideal dough texture, precise lamination, and perfect golden-brown finish. Below is a list of must-have tools that will elevate your croissant-baking game.
1. Rolling Pin: For Even Rolling and Lamination
The rolling pin is essential for flattening and rolling out the dough during the lamination process, where you fold butter into the dough to create layers.
- Smooth, Even Pressure: To ensure the dough is rolled evenly and to the right thickness, use a smooth, straight rolling pin (avoid ones with handles that can create uneven pressure). A non-stick rolling pin can also be helpful to prevent the dough from sticking.
- Marble Rolling Pin: If you want to take things to the next level, consider a marble rolling pin. The weight of marble can provide more even pressure, and it helps to keep the dough cool—important during the lamination process when the butter needs to stay cold.
- Size Matters: Your rolling pin should be long enough to handle the full width of your dough, but not too long that it becomes unwieldy. French-style rolling pins (without handles) are a good option as they give more control.
2. Pastry Brush: For the Perfect Egg Wash
A pastry brush is crucial for applying the egg wash to your croissants just before baking. The egg wash gives your croissants that glossy, golden-brown finish that makes them look irresistible.
- Even Coating: Use a soft-bristled pastry brush to apply the egg wash in a smooth, even layer without disturbing the dough. This ensures a professional, shiny finish.
- Flexible Bristles: Choose a brush with flexible bristles that can glide over the dough without dragging or pulling it apart.
- Avoid Over-applying: Lightly brush the croissants to avoid an overly thick layer of egg wash, which could cause the croissants to become too dark or lose their flaky texture.
3. Baking Sheets: Essential for Even Heat Distribution
A baking sheet is vital for even baking, especially for croissants, as they need to rise and bake evenly without burning. Proper heat distribution is key to achieving the crispy, golden exterior while maintaining a soft and airy interior.
- Heavy-Duty Baking Sheets: Opt for heavy-duty baking sheets or half-sheet pans for even heat conduction. These pans provide stability and help prevent the croissants from burning on the edges while they bake.
- Parchment Paper: Line your baking sheets with parchment paper to prevent sticking and to make clean-up easier. Parchment paper also helps to evenly distribute heat beneath the croissants for a uniform bake.
- Multiple Trays: If you’re baking large batches, having multiple trays can help you bake the croissants in stages, ensuring the best results for each batch.
4. Pastry Cutter or Sharp Knife: For Precise Shaping
A pastry cutter or a sharp knife is essential for cutting the dough into triangles before rolling the croissants. The shape and size of these cuts directly affect the final shape and flakiness of the croissants.
- Pastry Cutter: If you have a pastry cutter with a straight edge, it can give you clean, sharp cuts. A pastry cutter can also be used to slice through the layers of dough if you need to make precise folds.
- Sharp Knife: If you don’t have a pastry cutter, a sharp chef’s knife will work just as well. Ensure the knife is sharp enough to cut through the dough without pressing down too hard and squashing the layers.
- Uniformity: Be sure to cut the dough into uniform triangles (about 4-5 inches wide at the base) for even-sized croissants that bake uniformly.
5. Dough Scraper: For Easy Handling and Cleanup
A dough scraper (also known as a bench scraper) is a multipurpose tool that will make your life easier during the croissant-making process.
- Scraping and Lifting Dough: Use the scraper to gently lift and move dough without disturbing its shape or structure. It’s particularly helpful when you’re working with sticky dough or need to move dough from the counter to the fridge or baking sheets.
- Dividing Dough: If you’re working with a large batch of dough, a dough scraper can help you divide the dough evenly into portions without overhandling it.
- Cleaning Surfaces: It’s also a great tool for scraping any leftover bits of dough off your work surface, making cleanup faster and more efficient.
6. Cooling Rack: For Crisp and Flaky Croissants
Once your croissants have been baked to perfection, they need to cool on a wire cooling rack.
- Crisping the Croissants: A cooling rack allows air to circulate around the croissants as they cool, preventing condensation from forming and keeping the outer layers crispy and flaky.
- Preventing Sogginess: Cooling your croissants on a rack prevents the bottoms from becoming soggy as moisture escapes freely from all sides of the croissant.
7. Stand Mixer (Optional but Helpful)
While croissant dough can be made by hand, using a stand mixer can make the process easier, especially for beginners.
- Dough Hook Attachment: A stand mixer equipped with a dough hook can help you mix the dough quickly, and it’s particularly helpful when incorporating the yeast and liquids without overworking the dough.
- Speed and Consistency: Using a stand mixer allows you to keep the dough consistent and uniform, which is important when you’re preparing a dough that requires precise folding and laminating.
- Limitations: Although a stand mixer can help with the initial stages, you still need to laminate the dough by hand to achieve the signature flaky texture.
8. Ruler or Tape Measure: For Consistency
A ruler or tape measure may seem like an unconventional tool, but it is incredibly helpful when making croissants to ensure consistent sizes and layers.
- Precise Measurements: Use the ruler to measure the thickness of your dough as you roll it out to ensure that it is an even ¼-inch thick. This consistency is crucial for achieving uniform layers and an even rise.
- Shaping: A ruler can also be helpful for measuring the size of the triangular cuts you make before shaping the croissants. Each triangle should be the same size to ensure the croissants bake evenly.
9. Pastry Mat (Optional)
A pastry mat is another optional tool that can help ensure that your dough stays in the proper shape and prevents sticking.
- Non-Stick Surface: A silicone pastry mat provides a non-stick surface, which makes rolling out dough easier. It also offers a guide for keeping the dough’s shape consistent as you roll it out and fold it.
- Measurement Marks: Many pastry mats come with measuring guides for rolling out dough to precise thicknesses. This can be helpful when aiming for an even layer of dough that is critical for flaky results.
Conclusion
With the right tools, you can make the process of baking croissants more efficient and enjoyable. Each tool plays a role in helping you achieve the perfect balance of texture, flavor, and aesthetics that makes a croissant truly special. Whether you’re rolling the dough, shaping it into perfect triangles, or ensuring it cools evenly, these essential tools will guide you toward flaky, buttery perfection.
Why High-Quality Butter is Key to the Best Croissant Recipe
The butter you use in your croissant recipe is one of the most crucial ingredients that directly impacts the texture, flavor, and overall quality of the final product. High-quality butter is essential for creating the perfect croissant, and its influence extends beyond just taste. Here’s why investing in top-notch butter can elevate your croissants to bakery-quality perfection.
1. Butter’s Role in the Lamination Process
One of the key characteristics of croissants is their layered structure, which is achieved through a technique called lamination. Lamination involves folding butter into the dough multiple times to create thin layers that puff up during baking. The butter’s quality affects this process significantly.
- Fat Content: High-quality butter usually has a higher fat content (around 82% or more) compared to regular butter. This higher fat percentage is essential for the lamination process because it creates flaky, delicate layers as the butter melts and steams during baking.
- Consistency: The texture and consistency of the butter can impact how well it integrates into the dough. Premium butter is often more pliable and easier to work with, helping you create smooth layers without tearing the dough or overheating the butter, which could compromise the flakiness.
2. Flavor Enhancement
Butter is the dominant flavor in croissants, and its richness is what gives croissants their signature taste. High-quality butter adds depth, creaminess, and a slightly nutty flavor that you simply can’t achieve with lower-quality alternatives.
- Grass-Fed Butter: Butter made from grass-fed cows tends to have a richer, more nuanced flavor, with hints of earthiness and sweetness that come through in the final croissant. This type of butter is often higher in beneficial nutrients like omega-3 fatty acids and vitamin K2.
- Cultured Butter: Another option is cultured butter, which is made by fermenting cream before churning. This process creates a slightly tangy flavor that adds complexity and richness to your croissants. Cultured butter is particularly prized by professional bakers for the depth of flavor it brings.
3. Butter Texture and Crispiness
The texture of the butter directly impacts the texture of your croissants. High-quality butter results in the signature crisp, golden exterior and the soft, airy interior that defines the perfect croissant.
- Flaky Layers: When using premium butter, the layers in the croissant dough will be more distinct and crisp. This is because high-fat butter doesn’t break down as easily as lower-quality butter, allowing the layers to hold their shape better during baking. The butter traps steam as the croissants bake, causing them to puff up and become delightfully flaky.
- Golden Exterior: Quality butter also contributes to the color of the croissants. The rich butter helps produce a deep, golden hue when the croissants are baked, making them visually appealing in addition to tasting amazing.
4. Handling and Storage Benefits
High-quality butter can make your croissant dough easier to work with and less prone to the issues that might arise with lower-quality alternatives, such as greasiness or difficulty in handling.
- Easier to Laminate: Premium butter is more stable at different temperatures than cheaper varieties, making it easier to handle and fold into the dough. This stability is critical for maintaining the dough’s integrity during the folding process, reducing the chances of the butter seeping out or tearing the dough.
- Longer Freshness: High-quality butter tends to have a longer shelf life, meaning that it will retain its flavor and texture even after being stored in the fridge or freezer. This is important if you need to prepare dough ahead of time or store the dough for later use.
5. Why Not Use Margarine or Other Substitutes?
While margarine and other butter substitutes might seem like viable options due to their lower cost, they lack the natural fats, flavor, and consistency of real butter, which are critical to making the best croissants.
- Artificial Additives: Margarine often contains trans fats and artificial additives that can negatively affect the texture of the croissant dough, resulting in a less flaky and greasy texture. The flavor may also be flat or overly oily.
- Inconsistent Layers: Substitutes often don’t create the same crispy, airy layers that real butter does, because they have a different composition of fats that don’t melt and steam in the same way. This can result in a croissant that lacks the signature layers and bite.
6. How to Choose the Best Butter for Croissants
When selecting butter for your croissant recipe, here are some tips to help you choose the best option:
- Look for High Fat Content: Opt for butter with at least 82% fat content. European-style butters often have a higher fat content and are ideal for croissants.
- Go for Cultured or Grass-Fed Butter: Both types of butter add depth and flavor, so choose one based on your taste preferences.
- Avoid Salted Butter: Salted butter can interfere with the delicate balance of flavors in your croissants, so it’s best to choose unsalted butter to maintain control over the seasoning.
Conclusion
Using high-quality butter is the secret to creating croissants that are truly exceptional. From the lamination process to the flavor and texture, butter is the building block of the perfect croissant. By choosing premium butter, you ensure that your croissants are not only flaky and buttery but also have a rich, complex flavor that makes every bite irresistible. So, when baking your next batch of croissants, remember that quality butter is the foundation of croissant perfection.
Step-by-Step Guide to Making the Best Croissant Recipe at Home
How to Prepare the Perfect Croissant Dough
The dough is the heart of any good croissant, and preparing it correctly is essential to achieving those flaky, buttery layers that make croissants irresistible. The process of making croissant dough, known as laminated dough, involves multiple steps to incorporate butter into the dough through folding and rolling. This process helps create the layers that define croissants. Below is a detailed guide to preparing the perfect croissant dough.
1. Mix the Dough Ingredients (Creating the Base)
Before you can begin the lamination process, you must first make the dough. The ingredients for croissant dough are fairly simple, but their quality and precise proportions are critical to achieving the right texture.
- The Core Ingredients: The basic ingredients you’ll need for croissant dough are flour, water, yeast, sugar, salt, and butter. Each of these plays a specific role in the final dough:
- Flour: Use bread flour (or high-protein flour) for the best results. It gives the dough strength and elasticity, allowing the croissants to rise and hold their shape.
- Yeast: Use active dry yeast or instant yeast to help the dough rise. Yeast fermentation contributes to the airy texture of the croissants.
- Water: The water should be lukewarm, not hot, as extreme temperatures can kill the yeast.
- Sugar and Salt: The sugar feeds the yeast, encouraging fermentation, while the salt enhances the flavor of the dough.
- Mixing the Dough:
Start by activating the yeast in warm water with a pinch of sugar. Allow it to sit for 5-10 minutes until it becomes bubbly and frothy. In a separate bowl, combine the flour, remaining sugar, and salt. Gradually add the yeast mixture to the flour, stirring until the dough begins to come together. You can use a stand mixer with a dough hook or mix by hand until the dough is slightly sticky but still manageable.
2. Knead the Dough (Developing the Gluten)
Once the dough ingredients are mixed, it’s time to knead. Kneading the dough develops the gluten, which is essential for giving the dough its strength and elasticity.
- Kneading by Hand or Mixer: If kneading by hand, turn the dough out onto a lightly floured surface and knead for about 5-7 minutes. If using a stand mixer, knead with the dough hook for about 4-5 minutes on medium speed.
- Texture of the Dough: The dough should feel soft, smooth, and a little elastic. It shouldn’t be too sticky or dry. If the dough is too sticky, add a little more flour, one tablespoon at a time. If it’s too dry, add a small splash of water to bring it together.
3. First Rest (Allowing the Dough to Relax)
Once the dough is kneaded, it needs a chance to rest. This step allows the gluten to relax, making it easier to roll out later.
- Resting Time: Shape the dough into a ball and place it in a lightly oiled bowl. Cover the bowl with a clean kitchen towel or plastic wrap to prevent the dough from drying out. Let the dough rest in a warm, draft-free area for 1-2 hours, or until it has doubled in size. During this time, the yeast will ferment, creating tiny air bubbles that make the croissants light and airy.
4. Prepare the Butter Block (For Lamination)
The key to flaky croissants is the butter block—a sheet of butter that gets folded into the dough to create layers. The butter you use must be cold and firm to prevent it from blending into the dough.
- Chill the Butter: Use unsalted butter with a high fat content (at least 82%) for the best results. Take the butter out of the fridge and place it between two sheets of parchment paper or plastic wrap. Use a rolling pin to flatten the butter into a rectangle about 1/2 inch thick. Chill the butter again if it starts to soften too much.
- Butter Consistency: The key here is to have the butter and dough at similar temperatures, so when you roll them out, they’ll be pliable but not too soft. If the butter is too soft or too hard, it won’t create distinct layers and could cause the dough to tear.
5. Laminate the Dough (Incorporating the Butter)
Laminating is the most important part of the process. This is where the magic happens, and the croissant layers are formed. Laminating involves folding the dough with the butter in a series of turns and rest periods.
- Roll Out the Dough: After the dough has rested and doubled in size, roll it into a large rectangle, about 1/4 inch thick. Make sure it’s even in thickness to ensure the layers are uniform. Keep the work surface lightly floured to prevent sticking.
- Enclose the Butter: Place the chilled butter block in the center of the dough rectangle and fold the dough over to fully enclose the butter. Press the edges to seal the butter inside. This is the first step in the lamination process, and it’s crucial that the butter is fully contained.
- First Fold (Single Turn): Roll the dough out again into a long rectangle, about 1/4 inch thick, and fold the dough into thirds, like a letter. This is your first turn. After folding, wrap the dough in plastic wrap and refrigerate it for 30 minutes to chill and rest.
- Additional Turns: Repeat the rolling and folding process for a total of 3 turns, with 30-minute resting periods in between each turn. With each fold, the layers of butter and dough are created, which will form the flaky texture.
6. Shape and Final Rest (Shaping the Croissants)
Once the dough has been laminated and you’ve completed the necessary folds, the dough is ready to be shaped into croissants.
- Roll the Dough: Roll the laminated dough into a rectangle, about 1/4 inch thick, and cut it into triangles.
- Shape the Croissants: To shape the croissants, roll each triangle from the wide base toward the tip. Tuck the ends underneath to form a crescent shape.
- Final Rest: Place the shaped croissants on a baking sheet lined with parchment paper. Allow them to rest and rise for 1-2 hours, or until they’ve doubled in size. This step allows the dough to puff up, ensuring a light and airy texture.
7. Egg Wash and Bake (Achieving Golden Perfection)
Before baking, croissants are brushed with an egg wash to give them a golden-brown, glossy finish. This step is essential for the signature look of croissants.
- Egg Wash: Mix an egg with a tablespoon of water and brush it lightly over each croissant. Be careful not to apply too much, as it could interfere with the layers.
- Bake the Croissants: Bake the croissants in a preheated oven at 375°F (190°C) for 20-25 minutes, or until they’re golden-brown and crispy.
Conclusion
Preparing the perfect croissant dough takes time, attention to detail, and patience, but the results are worth it. From creating the dough base to the lamination process, each step is essential for achieving that light, flaky texture that makes croissants so special. With the right technique and quality ingredients, you’ll be able to create croissants at home that rival those from the best bakeries. Enjoy the process, and savor the delicious, buttery results!
Mastering the Laminated Dough Process for the Best Croissants
The laminated dough process is the key to creating the signature flaky, buttery texture of croissants. It’s what separates croissants from other pastries, and while it can seem complex, with patience and attention to detail, anyone can master it. Laminating dough involves folding layers of cold butter into the dough and then rolling it out multiple times to create thin, delicate layers. Here’s how to master this crucial step:
1. Understanding the Lamination Process: Layers are Key
The process of lamination creates the essential layers in croissant dough. As the dough and butter are rolled and folded repeatedly, the butter creates thin layers between the dough. During baking, these layers puff up due to the steam released from the melting butter, resulting in the light, flaky texture that croissants are known for.
- Layers of Butter and Dough: Think of each turn and fold as adding a new layer of butter and dough, which eventually forms hundreds of delicate layers. The more turns you make, the flakier your croissants will be. The goal is to achieve around 27-32 layers in total after three to four turns.
2. Why Temperature Matters in Laminating Dough
Temperature plays a crucial role in the lamination process, as it affects the consistency of the butter and the dough. The butter must remain cold and firm throughout the process to keep it from blending into the dough. At the same time, the dough should be soft enough to roll without tearing.
- Cold Butter is Essential: The butter should be firm but pliable, which is why it needs to be chilled but not frozen. If it’s too soft, it will seep into the dough, causing the croissants to lose their flaky texture. If it’s too hard, it will tear the dough when you try to fold it. Keep the butter in the fridge before you begin the lamination process, and take breaks between folds to ensure that the dough and butter stay cold.
- Chill the Dough Between Turns: After each fold (or “turn”), you should wrap the dough tightly in plastic wrap and refrigerate it for 30 minutes to 1 hour. This resting period allows the gluten to relax, making the dough easier to roll out, while also ensuring that the butter stays cold and doesn’t melt into the dough.
3. The Folding Process (Turns)
The lamination process involves a series of folds called turns. The dough is rolled out, folded into thirds, chilled, and then rolled out again. Each turn is what creates the layers, so it’s essential to get this step right.
- The First Turn (Simple Letter Fold): After the butter is enclosed in the dough, roll the dough out into a long rectangle (about 1/4-inch thick). Then, fold the dough into thirds like a letter—this is your first turn. This simple fold creates the first set of layers. After the first turn, chill the dough for at least 30 minutes before proceeding to the next turn.
- Subsequent Turns (Letter or Book Folds): Repeat the process of rolling and folding for a total of 3-4 turns, depending on how many layers you want to create. With each turn, you’ll notice the dough becoming more elastic and the butter layers more distinct. After each fold, be sure to refrigerate the dough for at least 30 minutes to allow it to firm up.
4. Common Mistakes to Avoid During Lamination
While laminating dough is not difficult, it requires precision and care. Here are some common mistakes to avoid that can disrupt the lamination process:
- Overworking the Dough: Kneading or rolling the dough too much during the lamination process can cause the gluten to become too tight. This will make it harder to roll out, and the layers may not form properly. If you feel resistance when rolling the dough, it’s time for a break—wrap the dough and refrigerate it to allow the gluten to relax.
- Uneven Butter Distribution: If the butter is unevenly distributed or the dough is too thin in certain areas, the butter may seep out during the folding process, creating gaps and preventing the layers from forming correctly. Make sure to roll the dough evenly and ensure the butter block is large enough to cover the dough completely.
- Not Chilling the Dough Long Enough: This is one of the most crucial steps. If the dough and butter are not cold enough during the folding process, they won’t hold their shape, and the croissants will lack the characteristic layers. Don’t skip the chilling periods between turns.
5. The Importance of Patience in the Lamination Process
Laminating dough takes time, and it’s crucial not to rush the process. Each fold and rest period contributes to the final texture of your croissants. The more care you put into each step, the better your results will be.
- Don’t Rush the Turns: Each turn should be done carefully, ensuring that the dough is rolled out to the correct thickness and folded properly. If you feel rushed or stressed, take a deep breath and remember that patience is key. Croissant dough requires time to develop, and the effort will pay off with perfect, flaky pastries.
- Take Your Time with Resting Periods: Resting the dough in between each turn is just as important as the folding itself. These breaks allow the dough to relax and the butter to firm up again, ensuring the dough stays pliable for future folds. Don’t skip these resting periods, even if you’re eager to move on.
6. The Final Result: Perfect, Flaky Layers
If you’ve followed the steps carefully, you’ll end up with beautifully laminated dough that, when baked, will transform into the light, flaky croissants everyone loves. The layers will puff up as the steam from the butter rises, creating a wonderfully airy texture and a crisp, golden-brown exterior.
- The Reward of Lamination: When you break open a perfectly baked croissant, the layers should be thin, delicate, and visible. Each bite should be a balance of crispy, buttery, and tender layers, giving you the ultimate croissant experience.
Conclusion
Mastering the laminated dough process for croissants takes time and precision, but once you get the hang of it, you’ll be able to create bakery-quality croissants at home. The secret lies in the quality of your ingredients, the temperature of your dough and butter, and your patience during the folding process. With these steps in mind, you’ll be on your way to creating the most delicious, flaky croissants imaginable—worthy of being called the best croissant recipe.
Discover what sets the best croissant recipe apart from the rest. If you’re looking to elevate your baking skills even further, check out this guide on how to make professional croissants at home for expert tips and techniques.
Shaping and Proofing Your Croissants the Right Way
Once you’ve successfully laminated your dough, it’s time for the next crucial steps in making perfect croissants: shaping and proofing. These two processes are key to ensuring your croissants not only look great but also achieve the desired texture and flavor. Shaping croissants correctly and allowing them to proof properly will help them rise to their full potential, giving them the characteristic flaky layers and airy interior that everyone loves. Here’s a step-by-step guide on how to do it the right way:
1. The Importance of Shaping Croissants Properly
Shaping croissants is more than just rolling dough—it’s about creating the right structure for the croissant to rise evenly and maintain its signature crescent shape. Proper shaping ensures that the butter layers stay intact and that the dough doesn’t deflate during baking.
- Roll the Dough Evenly: After your final fold and chill, roll the dough into a long, rectangular sheet. The dough should be about 1/4 inch thick and evenly rolled out. Make sure the edges are straight and the dough is uniform in thickness to ensure that all croissants bake at the same rate.
- Cutting the Dough: Once you have the dough rolled out, it’s time to cut it into triangles. You can use a sharp knife or a pizza cutter to slice the dough. Typically, croissants are made from triangles with a base width of about 5 inches and a length of about 7-8 inches. Make sure each triangle is a uniform size to ensure even baking.
- Shaping the Croissants: To shape the croissants, start by gently stretching the base of each triangle to make it a little wider. Then, starting at the wider end (the base), roll the dough tightly toward the tip, ensuring the layers are preserved as you go. Tuck the point of the triangle under the croissant to prevent it from unrolling during baking. For a classic crescent shape, curl the ends of the rolled dough inward slightly to form a crescent.
2. Proofing: Allowing Your Croissants to Rise
Proofing is the process where your shaped croissants rise and develop their light, airy texture. This is where the yeast has its final chance to activate, expanding the dough and giving it the perfect puff during baking.
- What is Proofing? Proofing is the final fermentation stage, where the dough undergoes a second rise after shaping. During proofing, the yeast continues to work, creating gas pockets in the dough and causing it to expand. This is what gives croissants their flakiness and height.
- The Ideal Proofing Environment: Croissants should proof in a warm, draft-free area. Ideally, the temperature should be around 75-80°F (24-27°C). Too much heat can cause the dough to over-proof, while a cooler environment can cause it to rise too slowly. If your kitchen is too cold, you can create a warm environment by turning your oven on for a few minutes, then turning it off and placing the croissants inside (with the oven light on).
- Proofing Time: Proofing usually takes 1-2 hours, depending on the ambient temperature. The croissants are ready to bake when they have doubled in size and spring back gently when pressed with a finger. However, be cautious not to let the dough over-proof, as this can cause the layers to collapse or the croissants to lose their structure.
3. Signs Your Croissants Are Ready to Bake
The goal of proofing is to get the dough to the perfect point of fermentation, where it’s light, airy, and ready to rise beautifully in the oven. Here’s how to tell when your croissants are ready for baking:
- Check the Volume: The croissants should have expanded significantly, doubling in size. They should look puffed and slightly airy, with visible gaps between the layers.
- The Finger Test: To check if the croissants are proofed properly, lightly press your finger into the dough. If the indentation stays and doesn’t spring back, they’re ready to bake. If it springs back immediately, they need more time to rise. If it collapses or the indentation is too deep, they may be over-proofed.
- Avoid Over-Proofing: Over-proofed croissants will become too soft and may not rise well in the oven. They may also collapse when you handle them or during baking. This is why it’s essential to monitor the proofing time closely.
4. The Role of Egg Wash in Shaping and Proofing
While shaping and proofing are crucial, an often-overlooked step is applying an egg wash to the croissants before baking. The egg wash adds a glossy, golden finish to the croissants and also helps them develop a crisp exterior.
- Preparing the Egg Wash: To make the egg wash, whisk together one egg with a tablespoon of water. Some bakers also add a pinch of salt to the egg wash to enhance the flavor.
- Applying the Egg Wash: Using a pastry brush, gently brush the egg wash over the proofed croissants before baking. Be sure to coat them evenly without over-applying, as excess egg wash can cause the croissants to become soggy.
- Avoid Egg Wash on the Bottom: When applying the egg wash, avoid brushing the bottom of the croissants. Doing so can prevent the croissants from browning properly and may affect the way they bake.
5. Common Mistakes to Avoid While Shaping and Proofing
Achieving the perfect croissant requires attention to detail during the shaping and proofing stages. Here are a few common mistakes to watch out for:
- Shaping Too Tightly: If you roll the croissants too tightly, they may not rise properly during proofing. Tight rolls can prevent the layers from expanding as they should, resulting in dense croissants. Roll the dough firmly but not too tightly, and allow the croissants to maintain some room for expansion.
- Under-Proofing: If the dough doesn’t rise enough during proofing, the croissants will be dense and lack the airy texture they’re known for. Make sure to give the croissants enough time to proof properly. Be patient, and don’t try to rush the process.
- Over-Proofing: As mentioned earlier, over-proofing can cause croissants to collapse or lose their shape during baking. Keep a close eye on the dough, and test it with the finger test to ensure it’s perfectly proofed.
6. Proofing Croissants Overnight (Optional)
For a more convenient baking process, some bakers prefer to proof croissants overnight in the fridge. This method gives the dough extra time to develop flavor and can make the croissants even more delicious. If you choose to proof overnight, follow these steps:
- Shaping the Croissants: Shape the croissants as usual and place them on a baking sheet. Once shaped, cover them with plastic wrap or a clean kitchen towel to prevent them from drying out.
- Refrigeration: Place the baking sheet in the fridge for 8-12 hours. The cooler temperature slows down the fermentation process, allowing the croissants to proof slowly while you sleep.
- Baking in the Morning: The next day, take the croissants out of the fridge and let them rest at room temperature for 30-60 minutes before baking. This helps them come to the right temperature and rise a little more before you pop them into the oven.
Conclusion
Shaping and proofing are critical steps in making the best croissants, and doing them properly ensures that your croissants will rise beautifully and have the perfect texture. By shaping with care, proofing in a controlled environment, and avoiding common mistakes, you’ll achieve the golden, flaky croissants that everyone will love. Don’t rush these processes—give your dough the time it needs to rise to its full potential, and you’ll be rewarded with perfect croissants every time.
Baking and Storing the Best Croissant Recipe for Freshness

Oven Temperature and Baking Tips for the Best Croissants
Once your croissants have been shaped and proofed to perfection, the next critical step is baking them. The right oven temperature and baking techniques will ensure your croissants achieve that beautiful, golden-brown, flaky exterior, and a light, airy interior. There are several factors to consider when it comes to baking the perfect croissants, and understanding how to adjust for your specific oven and dough will help you master this step of the process.
1. Ideal Oven Temperature for Croissants
Baking croissants requires a high heat to ensure that the butter layers within the dough puff up beautifully, resulting in those signature flaky layers. However, the temperature must be precise for the best results.
- Preheat Your Oven: Always preheat your oven to 400°F (200°C) before placing your croissants inside. The high heat helps to create an instant steam, which makes the croissants rise quickly and gives them a perfectly crisp exterior. A hot oven is essential to achieve that classic flaky texture.
- Oven Racks and Positioning: Place your baking sheet in the middle of the oven to ensure even heat distribution. Too close to the top or bottom of the oven may cause uneven baking, potentially burning the tops or bottoms of the croissants. If your oven is uneven, you can rotate the pan halfway through baking to promote even cooking.
- Convection vs. Conventional Ovens: If you’re using a convection oven, the temperature should be reduced by about 20°F (10°C), as convection ovens circulate heat more efficiently. This allows the croissants to bake evenly while preventing them from becoming too brown too quickly. For conventional ovens, stick with the higher temperature range of 400°F (200°C) to ensure that your croissants get the perfect rise and crispiness.
2. The Role of Steam in Baking Croissants
The key to flaky croissants is the steam generated inside the oven. Steam causes the dough layers to separate and puff up, creating that signature flaky texture.
- How to Create Steam: To create the necessary steam for your croissants, you can place a pan of water at the bottom of the oven while it preheats. Alternatively, you can spray a fine mist of water onto the oven walls just before you place the croissants inside. The moisture will quickly evaporate and create steam, which is essential for puffing up your croissants and ensuring that they’re crispy on the outside but tender inside.
- Avoid Opening the Oven Door: While the croissants are baking, it’s tempting to check on them, but opening the oven door can let out the steam, potentially affecting the rise. Try to resist opening the oven door for at least the first 15-20 minutes of baking to allow the croissants to puff up properly.
3. The Golden Egg Wash: A Shiny Finish
An egg wash is the final step in making your croissants truly shine and gives them that perfectly golden-brown finish. It also helps enhance the croissant’s exterior, providing a slight crispness and a glossy sheen.
- How to Apply Egg Wash: Before placing your croissants in the oven, gently brush them with an egg wash made from a beaten egg mixed with a tablespoon of water or milk. Use a pastry brush to coat the croissants evenly. Be careful not to over-apply the wash, as too much can cause the croissants to become soggy.
- Reapplying Egg Wash (Optional): If you notice that the croissants are not golden enough during baking, you can carefully apply another layer of egg wash halfway through the baking process. This can help intensify the color and create a shinier surface.
4. Baking Time: Achieving the Perfect Croissant Texture
The baking time for croissants can vary depending on the size and the oven, but generally, they will take 15-20 minutes to bake to perfection.
- Watch for Golden-Brown Color: Your croissants should turn a deep golden-brown as they bake. This is a sign that the butter layers inside are fully expanded, and the croissants are ready. The exterior should have a crisp texture, while the inside remains soft and airy.
- Baking in Batches: If you’re baking multiple trays of croissants, it’s best to bake them in batches. This ensures that the heat is distributed evenly, allowing each batch to bake properly. Don’t overcrowd the baking sheets, as this can lead to uneven results.
- Checking Doneness: The croissants are done when they’re golden-brown all over, and you can gently tap the bottom of the croissant to hear a hollow sound. This indicates that they are fully cooked through and have a perfect texture inside.
5. Allowing Croissants to Cool and Finish the Baking Process
Once your croissants are out of the oven, don’t rush to eat them right away. Allow them to cool for a few minutes on a wire rack to let the steam escape and prevent the bottoms from becoming soggy. This cooling period also helps the butter set inside the layers, giving the croissants that perfect balance of flakiness and softness.
- Cooling Time: Allow the croissants to cool for 5-10 minutes before serving. If you want to enjoy them warm, you can briefly reheat them in a low-temperature oven (around 300°F or 150°C) for 5 minutes.
- Storage and Reheating: If you have leftover croissants, store them in an airtight container for up to 2-3 days. To preserve their texture, reheat them in the oven at 350°F (175°C) for about 5 minutes to refresh them before eating.
6. Troubleshooting Common Baking Issues
Sometimes things don’t go as planned in the oven. Here are a few common issues and how to troubleshoot them:
- Croissants Are Too Dark or Burnt: If your croissants are browning too quickly, lower the oven temperature by 10-20°F or move the baking sheet to a lower rack to avoid direct heat. You can also cover the tops with aluminum foil halfway through baking to prevent them from over-browning.
- Croissants Aren’t Rising Properly: If your croissants aren’t rising as expected, it could be because the oven temperature isn’t hot enough. Ensure your oven is preheated properly, and consider adding a pan of water to generate more steam.
- Croissants Are Dense or Doughy Inside: If your croissants turn out dense or undercooked inside, make sure you’re proofing them long enough before baking. It’s also essential that your oven is at the correct temperature for the initial rise.
Conclusion
Perfectly baked croissants require careful attention to oven temperature, the creation of steam, and proper baking time. By following the ideal temperature and using baking tips such as the egg wash for a glossy finish and rotating your pan if needed, you’ll achieve the golden, flaky croissants of your dreams. Pay attention to these baking details, and you’ll enjoy croissants with an irresistibly light texture, crispy layers, and a deliciously golden exterior every time you bake.
Common Mistakes to Avoid in the Best Croissant Recipe
Making croissants can be a rewarding yet challenging process, and there are a few common mistakes that can derail your efforts. Even experienced bakers can make some of these errors, so it’s important to be aware of them before you start baking. Here’s a closer look at the most frequent pitfalls and how to avoid them to ensure your croissants turn out buttery, flaky, and perfect.
1. Using the Wrong Type of Flour
Flour is one of the most important ingredients in your croissant dough, and using the wrong type can result in a tough or overly dense pastry.
- Why It’s a Mistake: Croissants require a flour with a moderate to high protein content to achieve the right texture. All-purpose flour is often too soft for this purpose, and it might not give your dough the necessary structure for the best rise and flakiness.
- How to Avoid It: Bread flour or strong white flour is the ideal choice for croissant dough. These flours contain more gluten, which helps the dough develop structure and provides the chewy, airy texture croissants are known for. If you can’t find bread flour, you can use a combination of all-purpose and whole wheat flour to increase the protein content.
2. Not Kneading the Dough Enough
Kneading helps develop the gluten network that provides the dough with its structure, but there is a delicate balance to strike.
- Why It’s a Mistake: Under-kneading the dough will result in croissants that don’t hold their shape properly and will not rise well. On the other hand, over-kneading can cause the dough to become too elastic, making it difficult to roll out and layer properly during the lamination process.
- How to Avoid It: Knead the dough until it is smooth and elastic but not overly tough. The dough should feel slightly tacky to the touch but should not stick to your hands excessively. After kneading, allow the dough to rest and chill in the refrigerator, as this will make it easier to roll out and shape during the lamination stage.
3. Incorrect Butter Temperature or Folding Process
The butter plays a crucial role in creating the flaky layers of a croissant. If the butter is too soft or too hard, it can disrupt the lamination process and result in poor layers.
- Why It’s a Mistake: If the butter is too warm or soft, it will melt into the dough, making it difficult to maintain distinct layers. If it’s too cold, it will crack when you try to fold it into the dough, preventing proper lamination and leaving you with uneven layers.
- How to Avoid It: The ideal butter temperature is slightly colder than the dough but still pliable. When preparing the butter for lamination, make sure it’s cold but soft enough to roll out without cracking. Additionally, when folding the butter into the dough, work quickly to prevent it from warming up too much. Be patient, as maintaining the right temperature is key to achieving that delicate, flaky texture.
4. Rushing the Lamination Process
The process of laminating dough (folding butter into dough in layers) is essential for croissants to achieve their characteristic flakiness. Many bakers rush through the process, but this is a critical stage that requires patience and attention to detail.
- Why It’s a Mistake: Rushing through the folding and rolling process can lead to uneven layers, which will prevent the croissants from rising properly in the oven and can result in dense, heavy pastries.
- How to Avoid It: Ensure that each fold and roll is performed with precision and care. After each fold, chill the dough in the refrigerator for about 30 minutes to let the butter solidify. This keeps the butter from melting into the dough and ensures that it stays in distinct layers. Repeat the rolling and folding process 3-4 times to create multiple layers, giving your croissants the desired flakiness.
5. Over- or Under-Proofing the Dough
Proofing is when the dough is left to rest and rise, allowing the yeast to ferment and develop the dough’s flavor and texture. Getting the proofing process right is critical for croissants, and either over-proofing or under-proofing can lead to undesirable results.
- Why It’s a Mistake: Under-proofed croissants will be dense and heavy, as the dough hasn’t had enough time to rise and develop air pockets. Over-proofed croissants, on the other hand, can collapse during baking, leading to a poor texture and shape.
- How to Avoid It: The dough should double in size during proofing, but it’s essential to keep an eye on the temperature and humidity in the proofing environment. If your kitchen is too warm, the dough might rise too quickly, so ensure a cool, controlled environment. A proofing box or even a slightly turned-off oven can provide the right conditions. If you’re unsure, do the “poke test”: gently poke the dough, and if it springs back slowly, it’s ready.
6. Not Using Enough Butter
Butter is the heart of a croissant’s flavor and texture, so it’s important to use the right amount.
- Why It’s a Mistake: Using too little butter can result in croissants that are dry, lack flavor, and don’t have enough flakiness. Too much butter, on the other hand, can cause the layers to become soggy and difficult to handle.
- How to Avoid It: Follow the recipe’s butter-to-flour ratio closely. Ideally, you should use equal parts butter to dough, though this can vary depending on the recipe. Ensure the butter is evenly distributed through the dough by folding it in layers during the lamination process. This will create the rich, buttery flavor and flaky texture that defines the best croissants.
7. Not Preheating the Oven Properly
This may sound simple, but not preheating the oven or having it at the wrong temperature can affect how your croissants bake.
- Why It’s a Mistake: An oven that isn’t properly preheated won’t give the croissants the initial burst of heat they need to rise quickly. This will lead to poorly risen, dense croissants.
- How to Avoid It: Always preheat your oven for at least 20 minutes before baking. A properly preheated oven will allow your croissants to puff up in the first few minutes of baking and ensure they bake evenly. If you’re using a convection oven, remember to adjust the temperature and avoid opening the oven door frequently.
8. Overbaking or Underbaking Croissants
Baking time is crucial to getting the perfect croissant texture. Overbaking or underbaking can leave you with undesirable results.
- Why It’s a Mistake: Overbaked croissants will become dry and hard, while underbaked croissants may be doughy or raw in the center.
- How to Avoid It: Monitor your croissants closely as they bake, and watch for that golden-brown color. Croissants should bake for about 15-20 minutes, depending on their size and your oven’s temperature. Always perform a “tap test” on the bottom of a croissant: it should sound hollow when tapped if it’s fully baked.
Conclusion
By avoiding these common mistakes, you can drastically improve your chances of making the best croissants at home. From using the right flour and butter to mastering the lamination process and baking techniques, paying attention to detail at each step is key to success. With practice and patience, you’ll soon be able to bake croissants that are flaky, buttery, and absolutely irresistible.
How to Store and Reheat Your Croissants for Maximum Freshness
Croissants are best enjoyed fresh out of the oven, but with proper storage and reheating techniques, you can maintain their delicious texture and flavor for a few days. Whether you’ve made a batch ahead of time or have leftover croissants, following the right methods can help preserve their flakiness and buttery richness. Let’s dive into how to store and reheat croissants so they taste as fresh as the moment they were baked.
1. Storing Croissants Properly to Maintain Freshness
The key to preserving the freshness of croissants is minimizing air exposure and preventing moisture loss. While croissants are best eaten within the first day or two after baking, with the right storage method, they can still be enjoyed for a few more days.
- Room Temperature Storage: If you plan to eat your croissants within 1-2 days, store them at room temperature in an airtight container or a resealable plastic bag. Make sure the croissants are completely cooled before storing, as excess heat can create condensation, making them soggy. If you don’t have an airtight container, wrapping the croissants in wax paper or parchment paper followed by a layer of aluminum foil can also work well.
Avoid Plastic Wrap for Short-Term Storage:
- While plastic wrap can seem convenient, it can trap moisture and soften the croissants, leading to a loss of flakiness. It’s better to use materials that allow the croissants to breathe while still keeping them fresh.
- Long-Term Storage – Freezing Croissants: If you want to store your croissants for longer than 2 days, freezing is the best option. Freezing them at their peak freshness will preserve their texture and flavor.
- How to Freeze Croissants: Start by cooling the croissants completely. Then, place them in a freezer-safe bag or an airtight container. For added protection, you can wrap them individually in wax paper before placing them in the bag. Be sure to remove as much air as possible from the storage bag to prevent freezer burn. Croissants can stay frozen for up to 1-2 months.
- Tip for Freezing Before Baking: If you prefer to freeze croissants before baking, shape them and go through the proofing process until the croissants are ready for the oven. After this step, place the shaped croissants on a baking sheet, freeze them for 2 hours, and then transfer them to a freezer-safe bag or container. When you’re ready to bake, you can bake them directly from frozen, adding a few extra minutes to the baking time.
2. Reheating Croissants to Bring Back Their Freshness
Reheating croissants can be tricky, as you don’t want to end up with a soggy or tough pastry. To restore their crispiness and softness, there are a few ideal methods to use.
- Reheating Fresh Croissants: For croissants that are just a day or two old and stored at room temperature, the best method is to gently warm them in the oven. Preheat your oven to 350°F (175°C) and place the croissants on a baking sheet. Heat them for about 5-10 minutes or until the outside is crispy again. This method helps refresh the croissants without making them too dry.
- Reheating Frozen Croissants: If you’ve frozen your croissants, they can be reheated directly from the freezer or after thawing.
- For Direct Reheating from the Freezer: Preheat your oven to 375°F (190°C) and place the frozen croissants on a baking sheet. Bake for 15-20 minutes, or until golden and crispy on the outside. Adding a small pan of water at the bottom of the oven (to create steam) can help restore some of the moisture without making the croissants soggy.
- For Thawed Croissants: If you have time to thaw them, take the croissants out of the freezer and let them thaw at room temperature for about an hour. Once thawed, follow the same oven reheating instructions as fresh croissants to get them crispy.
Microwaving Croissants (Not Recommended for Perfect Flakiness):
- While the microwave is the quickest method for reheating croissants, it tends to soften the layers and makes the pastry less flaky. If you’re in a hurry and don’t mind losing some of the texture, you can microwave a croissant for 10-15 seconds on a microwave-safe plate. However, we recommend avoiding this method unless absolutely necessary.
- Using a Toaster Oven: A toaster oven can also work well for reheating individual croissants, especially if you’re short on time. Preheat your toaster oven to 350°F (175°C) and heat the croissant for about 5 minutes or until the outside is crispy again. This method is faster and can be more energy-efficient than using a full-size oven.
3. Tips for Maintaining Croissant Freshness After Reheating
To keep croissants fresh for as long as possible, follow these extra tips for preserving their deliciousness after reheating:
- Don’t Overheat: Croissants are best when they are not overheated, so keep an eye on the baking time. The goal is to warm the croissants through and restore their crispness, not to bake them further. Overheating can result in overly dry or burnt croissants.
- Avoid Reheating Multiple Times: Croissants should be reheated once for the best results. Repeated reheating can make the croissants lose their texture and flavor. Try to only reheat the number you plan to eat to avoid wasting any.
- Store in a Dry, Cool Area: When storing leftover croissants, ensure they’re in a dry, cool place. Excessive humidity or heat can cause them to become stale more quickly.
Conclusion
By following these storage and reheating tips, you can keep your croissants tasting fresh and delicious for longer. Whether you’re enjoying them the next day or reheating a batch from the freezer, these methods will help you maintain that perfect, flaky texture and buttery flavor that make croissants so irresistible. Proper storage ensures your pastries stay in their best form, and the right reheating technique brings them back to life, just like freshly baked.
Variations and Serving Ideas for the Best Croissant Recipe
How to Make Chocolate, Almond, and Savory Croissant Variations
While classic buttery croissants are always a delight, there’s no harm in getting creative with different fillings to give your pastries a unique twist. From rich chocolate to sweet almond and even savory options, there are endless variations that can elevate your croissant game. Let’s dive into how to make these delicious variations at home, using the best croissant dough as your base.
1. Chocolate Croissants: Adding a Decadent Twist
Chocolate croissants, or pain au chocolat, are a beloved variation that’s rich, indulgent, and perfect for a morning treat or a dessert. To make these, you’ll need some quality chocolate and just a few extra steps in the shaping process.
- Choosing the Right Chocolate: For the best chocolate croissants, opt for high-quality dark chocolate or milk chocolate bars instead of chips. Chocolate bars are easier to place inside the dough and melt more smoothly. Choose chocolate with around 60-70% cocoa content for a balance of sweetness and richness.
- Assembly:
- After rolling out your croissant dough, cut it into rectangles that are slightly larger than the size of your chocolate bar pieces.
- Place a piece of chocolate near the center of each rectangle.
- Roll the dough tightly around the chocolate, making sure to seal the edges well to avoid the chocolate leaking out during baking.
- Proceed with proofing and baking as you would with the classic croissant.
- Baking Tips: Since chocolate can melt and ooze out, it’s helpful to line your baking sheet with parchment paper to catch any drips. You can also sprinkle a little powdered sugar on top after baking to add a touch of sweetness.
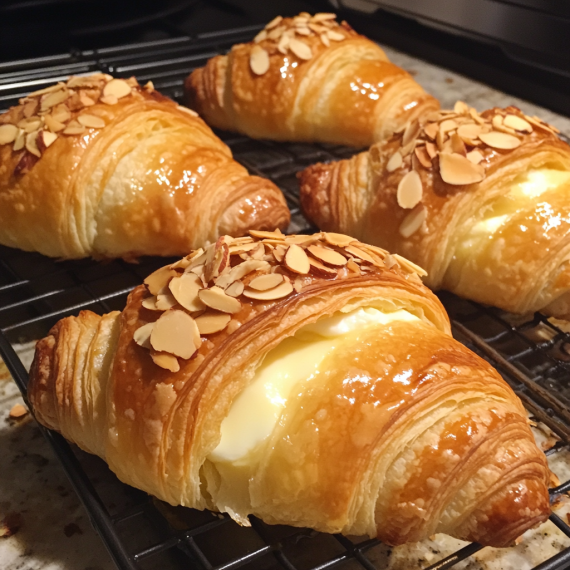
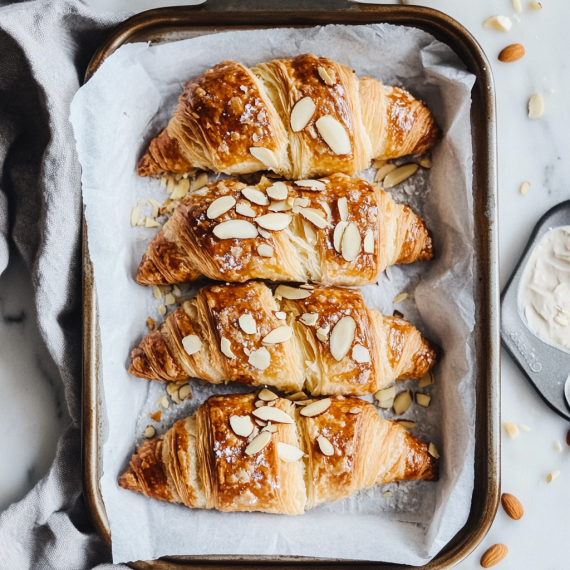
2. Almond Croissants: Sweet and Nutty Perfection
Almond croissants are a decadent treat that combines the flakiness of the pastry with a sweet, nutty filling. They’re perfect for those who crave something a bit more indulgent than the classic croissant but still want that buttery, flaky texture.
- Making the Almond Filling: The almond filling is made from a mixture of almond paste, butter, sugar, egg, and vanilla extract. You can find almond paste at most grocery stores, or you can make it at home by blending blanched almonds with sugar and a bit of water.
- Assembly:
- After baking your croissants and letting them cool slightly, cut each one in half horizontally, but don’t slice all the way through (leave the base intact).
- Spread a layer of almond cream or almond paste inside the croissant.
- Close the croissant back up, and if you like, brush the top with egg wash to achieve a golden, glossy finish.
- Bake the croissants a second time to heat the filling and create a perfectly crisp exterior.
- Finishing Touches: After baking, you can top the almond croissants with sliced almonds and a drizzle of simple syrup or a sprinkle of powdered sugar for an extra sweet touch.
3. Savory Croissants: A Bold, Flavorful Alternative
Savory croissants are a fantastic choice for breakfast or as part of a brunch spread. These croissants can be filled with various ingredients like cheese, ham, spinach, or herbs. The savory filling can either be tucked inside the croissant dough or spread on top before baking.
- Popular Savory Fillings:
- Cheese: Go for Gruyère, cheddar, or brie for a rich, melty filling. A classic option is a combination of ham and cheese—just layer thin slices of ham and cheese inside the dough before rolling.
- Spinach and Feta: For a Mediterranean twist, sauté spinach with garlic and mix with feta cheese. Spread this mixture inside the dough for a flavorful, vegetarian option.
- Herbs and Garlic Butter: A simple filling of garlic butter and a mix of fresh herbs (like thyme, rosemary, or chives) can be spread on the dough before rolling it up. This makes for a deliciously fragrant savory croissant.
- Assembly:
- After rolling out your croissant dough, spread your chosen savory filling on the dough before rolling it up.
- Be careful not to overstuff the croissants, as too much filling can cause the dough to break apart or the filling to leak out during baking.
- For savory croissants with cheese, you can place a piece of cheese in the center of the dough and then wrap the dough around it, ensuring the cheese stays inside.
- Brush the croissants with an egg wash for a glossy finish and sprinkle with a little sea salt or herbs for extra flavor.
- Baking Tips: Savory croissants might need a slightly longer baking time than sweet croissants, depending on the thickness of the filling. Make sure to keep an eye on them and adjust the baking time if necessary to achieve a golden, crispy crust.
4. Creative Variations: Other Fillings to Try
- Apple Cinnamon Croissants: Fill your croissant dough with a mixture of cooked cinnamon apples, sugar, and butter for a delicious dessert croissant. This variation pairs beautifully with a cup of coffee or tea.
- Lemon Cream Cheese Croissants: For a tangy twist, spread a mixture of cream cheese, lemon zest, and a little sugar inside the dough for a refreshing treat.
- Bacon and Cheddar Croissants: A hearty, savory breakfast option. Layer crispy bacon and cheddar cheese inside the croissant dough for a flavorful start to your day.
Conclusion
By experimenting with chocolate, almond, and savory fillings, you can elevate your croissant-making skills to a whole new level. These variations offer something for everyone, whether you’re craving a sweet indulgence or a savory snack. The beauty of croissants is that they are versatile, so don’t hesitate to get creative with fillings and flavors to suit your preferences. With a bit of practice and the right ingredients, you’ll be able to master these variations and delight your taste buds with each flaky bite.
Pairing the Best Croissant Recipe with Coffee, Tea, and More
A croissant is not just a delightful pastry on its own—it can become part of a memorable culinary experience when paired with the right beverage. Whether you’re enjoying a classic butter croissant, a chocolate-filled one, or a savory option, the right drink can enhance its flavors and elevate the overall experience. Let’s explore how to pair the best croissant recipe with coffee, tea, and other beverages to create the perfect balance.
1. Pairing Croissants with Coffee: A Match Made in Heaven
Coffee and croissants have long been a classic combination, offering a satisfying balance of flavors that complement each other perfectly. The rich, robust taste of coffee pairs well with the buttery, flaky texture of croissants, creating a harmonious contrast.
- Espresso and Butter Croissants: For the most classic pairing, enjoy a strong espresso with a traditional butter croissant. The intense flavor of the espresso enhances the croissant’s delicate, buttery taste. Espresso’s boldness cuts through the richness of the pastry, making each bite feel even more satisfying.
- Cappuccino and Chocolate Croissants: A cappuccino, with its frothy milk and smooth texture, complements the rich, gooey chocolate inside a pain au chocolat. The balance of creaminess from the cappuccino and the sweetness of the chocolate creates a comforting and indulgent pairing.
- Flat White with Almond Croissants: A flat white, known for its velvety milk and smooth texture, pairs beautifully with an almond croissant. The nutty, sweet almond filling in the croissant is a perfect match for the subtle richness of the flat white. The smoothness of the milk enhances the croissant’s buttery, nutty flavor without overpowering it.
- Iced Coffee with Savory Croissants: For a more refreshing option, try pairing a cold brew or iced coffee with a savory croissant, like a ham and cheese croissant. The chill of the iced coffee balances the richness of the savory filling, and the smoothness of cold brew coffee complements the saltiness of the cheese and ham.
2. Pairing Croissants with Tea: Light, Aromatic, and Elegant
Tea is a great alternative to coffee, especially if you’re looking for a lighter, more aromatic pairing that allows the flavors of the croissant to shine. Different types of tea can complement various croissant fillings, providing a refreshing contrast or harmonious balance.
- Earl Grey Tea and Lemon Croissants: If you’re enjoying a citrusy croissant (like a lemon cream croissant), pair it with Earl Grey tea. The bergamot in Earl Grey tea enhances the bright, tangy flavor of the lemon and creates an elegant pairing that’s light but flavorful.
- Green Tea and Almond Croissants: The lightness and subtle vegetal notes of green tea work wonderfully with almond croissants. Whether you’re enjoying almond paste-filled croissants or a simple almond croissant, the earthy and slightly grassy flavor of green tea creates a balanced pairing that’s not too overpowering. For an extra touch, try pairing with matcha green tea for a more intense green flavor.
- Chai Tea and Spiced Croissants: If you’re making a croissant with spices like cinnamon or nutmeg (think apple cinnamon croissants), a chai latte is the perfect match. The warm, spicy flavors of chai blend beautifully with the aromatic spices in the croissant, creating a cozy and comforting pairing ideal for chilly mornings.
- Black Tea with Savory Croissants: If you’re enjoying savory croissants, like those filled with cheese, ham, or spinach, try pairing them with a robust black tea, such as Assam or Darjeeling. The strong tannins in black tea complement the richness of the savory filling and act as a perfect palate cleanser between bites.
3. Pairing Croissants with Hot Chocolate: A Sweet Indulgence
For those with a sweet tooth, pairing a croissant with a warm mug of hot chocolate can create an irresistible treat. Hot chocolate’s smooth, creamy texture and rich, chocolatey flavor go hand-in-hand with a buttery or chocolate-filled croissant.
- Rich Dark Hot Chocolate and Chocolate Croissants: If you’re indulging in a pain au chocolat, a rich and slightly bitter dark hot chocolate will enhance the sweetness of the croissant’s chocolate filling. The depth of the dark chocolate helps to accentuate the croissant’s delicate layers, while still complementing the richness of the pastry.
- Milk Hot Chocolate and Almond Croissants: For a sweeter, creamier combination, pair a milk hot chocolate with an almond croissant. The smooth, creamy texture of milk chocolate adds a luxurious note to the nutty filling of the almond croissant, making for an indulgent treat that’s perfect for a cozy brunch or afternoon snack.
4. Pairing Croissants with Fresh Juices: A Bright, Refreshing Contrast
If you’re looking for a lighter, more refreshing beverage to accompany your croissant, fresh juices are a great choice. Their natural sweetness and tartness can offer a delightful contrast to the buttery richness of croissants.
- Orange Juice and Butter Croissants: A classic pairing, freshly squeezed orange juice and a buttery croissant work beautifully together. The acidity and citrusy freshness of orange juice cut through the richness of the croissant, creating a bright and refreshing contrast.
- Apple Juice with Cinnamon Croissants: If you’re enjoying a cinnamon-spiced croissant, such as a cinnamon roll croissant, pair it with a glass of fresh apple juice. The sweet, crisp flavor of apple juice complements the warm, spiced notes of the croissant, enhancing the overall experience.
5. Pairing Croissants with Sparkling Wine: A Touch of Elegance
For a special occasion or an indulgent breakfast, pairing a croissant with sparkling wine or champagne can add an elegant touch to your meal. The effervescence of sparkling wine pairs wonderfully with the light, flaky texture of croissants, creating a luxurious experience.
- Champagne and Butter Croissants: The classic pairing of champagne and a simple butter croissant is a timeless choice. The acidity and bubbles of champagne cleanse the palate between bites, while the buttery croissant provides a rich, satisfying counterpoint.
- Prosecco and Fruit-Filled Croissants: For fruit-filled croissants, like those with berry or apple filling, Prosecco is an excellent choice. The slightly sweeter, fruitier notes of Prosecco enhance the sweetness of the fruit, creating a delightful pairing for a brunch or celebratory occasion.
Conclusion
Pairing the best croissant recipe with the perfect beverage takes your pastry experience to the next level. Whether you’re enjoying a cup of coffee, a pot of tea, or even a glass of fresh juice or sparkling wine, each drink complements the buttery, flaky croissants in its own unique way. The key is to balance the flavors—coffee and tea for richness and warmth, fresh juices for a light contrast, or indulgent hot chocolate and sparkling wine for extra luxury. No matter the pairing, your croissant moment will be made even more memorable with the right drink by your side.
FAQs About Baking the Best Croissants
Baking the perfect croissants at home can seem like a challenging task, but with the right knowledge and technique, it’s entirely achievable. To help guide you through the process and answer some common concerns, we’ve compiled a list of frequently asked questions about baking the best croissants. From the dough to the final bake, here are answers to some of the most common queries you might have.
1. How do I know if my croissant dough is ready?
The key to perfect croissants is getting the dough just right. When preparing the dough, you should look for a few signs that indicate it’s ready for the laminating process:
- Smooth and Elastic Texture: After kneading, your dough should feel smooth and slightly elastic, not too sticky or dry.
- Proper Resting Time: Give the dough enough time to rest in the fridge to allow the gluten to relax and firm up. If you try to roll the dough before this, it will be hard to work with.
- Cold and Firm Dough: Make sure the dough is cold before starting the lamination process. Cold dough helps achieve the desired flaky layers when it’s rolled and folded.
If your dough is difficult to roll out or feels too soft, it likely needs more chilling time before continuing the lamination steps.
2. How can I get my croissants extra flaky?
The secret to super flaky croissants lies in the lamination process—folding butter into the dough multiple times to create thin layers of dough and butter that puff up when baked. Here are some tips to enhance the flakiness:
- Use High-Quality Butter: The butter you use will make a significant difference. Opt for European-style butter with a higher fat content, as it gives the croissants more richness and helps achieve a better flake.
- Proper Butter Temperature: Ensure the butter is cold but pliable—it should not be too soft or too hard. If it’s too soft, it will mix into the dough, resulting in a greasy texture; if it’s too hard, it will break the dough as you roll it out.
- Don’t Skip the Folding and Resting: Properly fold the dough and butter several times, giving it enough rest in between to ensure the layers stay distinct. This process creates the “lamination” that results in a light and flaky croissant.
- Roll the Dough Evenly: When rolling out the dough, make sure it’s done evenly to ensure uniform layers. Uneven dough can cause some areas to be thicker and others thinner, impacting the final texture.
3. Can I make croissant dough in advance?
Yes, croissant dough can be made ahead of time and stored for later use, making the process a bit more manageable for busy bakers. Here’s how you can store the dough:
- Chill the Dough: After preparing and rolling the dough, wrap it tightly in plastic wrap and refrigerate it. You can leave it for up to 24 hours before proceeding with the lamination steps.
- Freezing the Dough: For longer storage, you can freeze the dough after it has been shaped into croissants but before the final proofing stage. Wrap the uncooked croissants tightly in plastic wrap or a resealable bag, and freeze for up to one month. When ready to bake, thaw the croissants overnight in the fridge, and allow them to proof before baking.
This makes it possible to prepare the dough ahead of time and have fresh, homemade croissants whenever you like.
4. How long should I bake my croissants?
The baking time for croissants depends on the size and type of oven you’re using, but typically, croissants bake for about 15-20 minutes at 400°F (200°C). Here’s how to ensure they’re perfectly baked:
- Golden Brown and Puffy: The croissants should be golden brown and fully puffed up when they’re done. The layers should have expanded and the surface should be crisp and glossy.
- Baking Temperature: For the best results, use a high temperature of 400°F (200°C) to achieve that beautiful golden color and flaky texture. However, if you notice that they are browning too quickly, you can lower the temperature to 375°F (190°C) after the first 10 minutes.
To ensure even baking, place your croissants in the center of the oven, and consider rotating the baking sheet halfway through the cooking time.
5. Why aren’t my croissants rising properly?
If your croissants aren’t rising as expected, there may be a few factors to consider:
- Inactive Yeast: Make sure your yeast is fresh and activated. If using active dry yeast, dissolve it in warm water or milk and let it bloom for about 5-10 minutes. If the mixture doesn’t bubble or foam, the yeast might be dead, and it will affect the dough’s rise.
- Under-Proofing: Croissants need enough time to rise. If they haven’t proofed properly before baking, they won’t expand in the oven as they should. Be patient and give the croissants 1-2 hours to proof until they are puffy and slightly increased in size before placing them in the oven.
- Too Cold or Hot Dough: If the dough is too warm when it’s time to bake, the butter may melt too quickly, causing the layers to collapse. On the other hand, dough that is too cold will not rise properly. The dough should be cold but not too firm when baking.
6. Can I make croissants without a stand mixer?
Yes, you can make croissants without a stand mixer, but it will require a bit more elbow grease. While a stand mixer can make the process easier by kneading the dough for you, it is entirely possible to make croissants by hand. Here’s what you need to do:
- Knead by Hand: When mixing the dough, combine the ingredients by hand until you achieve a shaggy consistency. Then, transfer the dough to a clean surface and knead it by hand for 8-10 minutes until smooth and elastic.
- Manual Lamination: For the lamination process, simply fold the dough and butter by hand, using a rolling pin to roll out the dough and fold it multiple times. The key is to be patient and consistent with each fold to achieve those beautiful layers.
While using a stand mixer is more efficient, making croissants by hand can give you a more hands-on experience and can still result in delicious croissants.
7. Can I make croissants without butter?
While butter is a key ingredient for traditional croissants, you can make dairy-free or vegan croissants using plant-based alternatives. Here’s how:
- Vegan Butter: Substitute vegan butter or margarine for the butter in the dough and during the lamination process. Make sure the vegan butter is of similar consistency to regular butter and that it remains cold when working with the dough.
- Non-Dairy Milk: Instead of regular milk, use almond milk, oat milk, or another non-dairy milk for the dough. Just ensure the milk is unsweetened to maintain the savory flavor profile of the croissants.
- Additional Adjustments: You may also want to use a vegan egg wash (such as a mixture of plant-based milk and maple syrup) to give your croissants a glossy finish after baking.
While the texture and flavor may vary slightly, vegan croissants can still be flaky, buttery (thanks to the vegan butter), and just as delicious.
Conclusion
Baking the best croissants involves patience, precision, and the right technique. By addressing common questions like how to tell when the dough is ready, how to avoid mistakes, and how to store croissants for freshness, you’ll be well on your way to creating bakery-quality croissants in your own kitchen. Keep these tips in mind, and you’ll be a croissant master in no time!
And finally
Making the best croissants at home is within your reach! By following this step-by-step guide, you can master the art of creating buttery, flaky, and delicious croissants right in your own kitchen. Remember, the key is using high-quality ingredients, taking your time with each step, and being patient throughout the process.
- Essential Ingredients: From the perfect butter to the right flour and yeast, using top-notch ingredients will ensure your croissants have that rich flavor and texture everyone loves.
- Techniques Matter: Mastering the lamination process and proofing your dough are critical to achieving that signature puff and flakiness.
- Tools for Success: Having the right tools, such as a rolling pin and a baking thermometer, will make the process smoother and more efficient.
We hope this recipe inspires you to give homemade croissants a try. Don’t forget to share your results with us—whether they turn out perfectly golden or slightly imperfect, we’d love to hear about your experience!
Join the conversation: Drop a comment below with your questions or tips for other bakers. Feel free to share this recipe on social media and tag us when you try it. And if you want to see more delicious recipes like this, don’t forget to subscribe to our newsletter for the latest updates and baking tips.
Happy baking, and enjoy your croissants!