
If you’re looking for a bold and flavorful seafood dish, this Pan-Fried Blackened Red Snapper Recipe is a must-try! Red snapper is a delicious, flaky white fish that pairs perfectly with a spicy blackened seasoning and a crispy, golden crust. This easy recipe brings out the best in red snapper, combining rich Cajun flavors with a quick and simple pan-frying method.
Blackening is a classic Louisiana-style cooking technique that involves coating the fish in a savory spice blend—typically made with paprika, cayenne, garlic powder, and black pepper—then searing it in a hot cast iron skillet with butter or oil. The result? A beautifully charred, smoky crust that locks in all the flavors!
Best of all, this quick and easy recipe comes together in just 15 minutes, making it perfect for a weeknight meal or an impressive seafood dish for guests. Whether you serve it with rice, coleslaw, or roasted vegetables, this blackened red snapper is sure to be a hit at your dinner table.
Ready to cook? Let’s dive into the recipe!
What Makes This Blackened Red Snapper Recipe Special?

The Origins of Blackened Fish in Cajun Cuisine
Blackened fish is a staple of Cajun cuisine, known for its bold flavors, crispy crust, and smoky aroma. This unique cooking technique was popularized in the 1980s by Chef Paul Prudhomme, a legendary Louisiana chef who wanted to bring the flavors of traditional Cajun and Creole cooking to a broader audience.
The Cajun Influence
Cajun cuisine originated from Acadian settlers who migrated to Louisiana from Canada in the 18th century. Their cooking style was deeply rooted in French culinary traditions, but it evolved in the Louisiana bayous, where they incorporated local ingredients like seafood, rice, and spicy seasonings. Over time, Cajun cuisine became known for its bold, smoky, and well-seasoned dishes, and blackening was a natural extension of that tradition.
How Blackening Became Popular
While grilling and frying were already common in Cajun cooking, blackening introduced a new way to prepare fish. The process involves coating fish (or other proteins) in a highly seasoned spice mix, then cooking it over very high heat in a cast iron skillet with butter or oil. This creates a deep, flavorful crust that is slightly charred on the outside while keeping the inside moist and tender.
When Chef Paul Prudhomme featured blackened redfish at his New Orleans restaurant, K-Paul’s Louisiana Kitchen, it became an instant hit. The dish gained widespread popularity, leading to a nationwide blackened seafood craze in the 1980s. Soon, blackening was adopted not just for fish but also for chicken, shrimp, and even steak.
Why Red Snapper is Perfect for Blackening
Among the many types of fish used in Cajun cooking, red snapper is an excellent choice for blackening. It has a mild, slightly sweet flavor that pairs well with spicy blackened seasoning, and its firm texture holds up beautifully to high-heat cooking. Plus, red snapper is widely available and often featured in Louisiana seafood dishes.
Today, blackened fish remains a favorite dish in Cajun and Creole cuisine, served in restaurants and home kitchens alike. Whether you’re a seafood lover or just exploring Cajun flavors, this Pan-Fried Blackened Red Snapper Recipe is a delicious way to enjoy this classic cooking technique!
Why Red Snapper is the Perfect Fish for Blackening
Blackening is a bold and flavorful cooking technique that works best with firm, mild fish that can withstand high heat without falling apart. Among the many fish options available, red snapper stands out as the perfect choice for blackening due to its texture, flavor, and ability to absorb seasonings beautifully. Here’s why red snapper is the ultimate fish for a blackened recipe:
1. Firm Yet Flaky Texture
One of the biggest challenges of blackening fish is finding a variety that holds up to high-heat cooking without falling apart. Red snapper has a firm, yet flaky texture, which means it maintains its structure in a hot cast iron skillet while still being delicate and tender when eaten. Unlike softer fish that may break apart under high heat, red snapper sears beautifully, creating a delicious, crispy crust while keeping the inside moist and flaky.
2. Mild, Sweet Flavor That Pairs Well with Spices
Red snapper has a mild, slightly sweet taste, making it the perfect canvas for bold blackened seasoning. The signature spice blend—usually made with paprika, cayenne pepper, garlic powder, onion powder, thyme, and black pepper—enhances the fish’s natural flavors without overpowering them. Unlike stronger-flavored fish like mackerel or salmon, red snapper balances the spice and smokiness of blackening, creating a harmonious blend of flavors.
3. Ideal for High-Heat Cooking
Blackening requires very high heat to create the signature dark, crispy crust on the outside while keeping the inside tender. Red snapper can handle this intense cooking method without becoming too dry or tough. The natural oils in red snapper help keep it moist, ensuring that each bite is flavorful and juicy. Additionally, the fish’s skin crisps up beautifully, adding an extra layer of texture and flavor if you choose to cook it with the skin on.
4. Readily Available and Versatile
Red snapper is widely available in seafood markets and grocery stores, especially in coastal regions. It is often sold fresh or frozen, in fillets or whole fish, making it accessible for home cooks who want to try blackened seafood recipes. Plus, if you’re looking to explore other Cajun dishes, red snapper is a great option for grilling, baking, and frying, making it a versatile choice for any seafood lover.
5. A Classic in Southern and Cajun Cuisine
Red snapper is a staple in Southern and Cajun cooking, often featured in New Orleans-style seafood dishes. Its popularity in Creole and Cajun cuisine makes it a natural choice for blackening, a technique that originated in Louisiana. Many authentic Cajun recipes highlight red snapper for its ability to absorb spices while maintaining a rich, seafood flavor that pairs well with classic Southern sides like dirty rice, cornbread, and coleslaw.
Final Thoughts
If you’re looking for the best fish for blackening, red snapper is the top choice. Its firm texture, mild yet slightly sweet flavor, and ability to handle high-heat cooking make it the perfect candidate for a bold, spicy blackened crust. Whether you’re cooking it for a quick weeknight meal or a Southern-style seafood feast, this Pan-Fried Blackened Red Snapper Recipe will deliver restaurant-quality results every time!
Key Characteristics of Blackened Seasoning
Blackened seasoning is the heart of any blackened fish recipe, and its bold, smoky, and slightly spicy flavors make it a staple in Cajun and Creole cuisine. This seasoning blend is what gives blackened red snapper its distinctive crust, deep color, and rich taste. Below are the key characteristics that define blackened seasoning and make it perfect for red snapper.
1. Bold and Spicy Flavor Profile
Blackened seasoning is known for its powerful, well-balanced flavor that combines heat, smokiness, and aromatic spices. While spice levels can be adjusted, traditional blackened seasoning typically contains cayenne pepper, black pepper, and paprika, which give it a warm, slightly fiery kick. The combination of garlic powder, onion powder, and dried herbs like thyme and oregano adds depth and complexity, making every bite savory, smoky, and aromatic.
2. Creates a Signature Blackened Crust
One of the defining features of blackened seasoning is its ability to create a dark, crispy crust on fish, chicken, or other proteins when cooked over high heat in a cast iron skillet. This happens because the butter or oil used in cooking binds with the seasoning and caramelizes, forming a flavorful charred coating. The result is a crispy outer layer that enhances the fish’s natural taste while keeping the inside moist and tender.
3. A Perfect Blend of Smoky, Savory, and Herbal Notes
Blackened seasoning isn’t just about heat—it’s about balance. The smoky depth of paprika, the earthy aroma of oregano and thyme, and the savory richness of garlic and onion powder work together to create a complex and well-rounded seasoning. While the spicy elements provide heat, the herbs and aromatics ensure that the seasoning is flavorful rather than overwhelmingly hot.
4. Versatile and Customizable
One of the best things about blackened seasoning is its versatility. While traditional blends follow a Cajun-inspired flavor profile, the seasoning can be customized to suit different spice preferences. Some variations may include:
- Smoked paprika instead of regular paprika for a deeper smoky flavor.
- More cayenne pepper for extra heat or less for a milder version.
- A touch of brown sugar to balance out the spice with a slight sweetness.
- Additional herbs like basil or rosemary for a unique twist.
This adaptability makes blackened seasoning a go-to spice blend for seafood, poultry, steak, and even vegetables.
5. Ideal for High-Heat Cooking Methods
Blackened seasoning is designed to be used in high-temperature cooking, typically in a cast iron skillet with butter or oil. The intense heat sears the seasoning into the fish, locking in flavor and creating the perfect crusty texture. Unlike some spice blends that might burn too quickly, blackened seasoning is crafted to withstand high-heat cooking, making it ideal for pan-frying, grilling, and even broiling.
Final Thoughts
The key to a perfect Pan-Fried Blackened Red Snapper Recipe lies in the seasoning. A well-balanced blackened spice mix brings out the best in red snapper, adding a smoky, spicy, and deeply flavorful crust that enhances the fish’s natural sweetness. Whether you use a store-bought blend or make your own, blackened seasoning is essential for achieving that authentic Cajun-style taste.
Ingredients You Need for This Pan-Fried Red Snapper Recipe

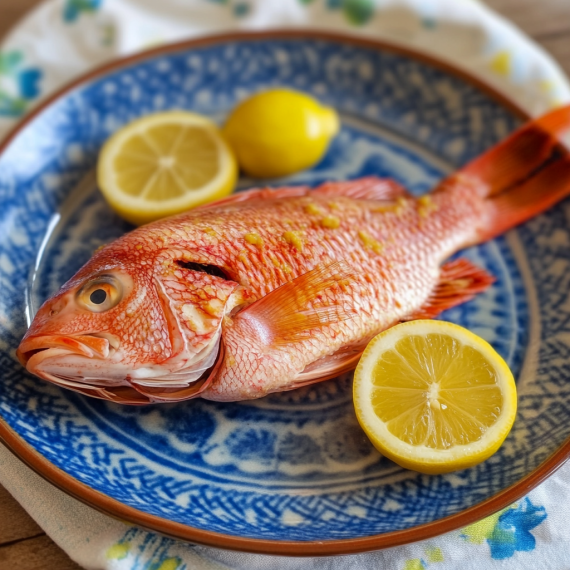
Fresh Red Snapper Fillets
Fresh red snapper is often considered the gold standard for seafood lovers because of its delicate texture and mild, sweet flavor. If you have access to high-quality fresh red snapper, it can elevate your dish with superior taste and texture.
Pros of Fresh Red Snapper
- Better texture – Fresh fillets have a firmer, more delicate texture compared to frozen ones, which may become slightly softer after thawing.
- Optimal flavor – Fresh fish retains its natural sweetness and mild seafood taste without any loss of flavor due to freezing.
- No need for thawing – You can cook it right away, reducing prep time.
Cons of Fresh Red Snapper
- Shorter shelf life – Fresh fish should be cooked within 1-2 days of purchasing to ensure peak freshness.
- Availability – Depending on where you live, finding fresh, high-quality red snapper may be difficult or expensive.
- Higher cost – Fresh fish is often more expensive than frozen options, especially if it has to be transported from coastal areas.
Frozen Red Snapper Fillets
Frozen red snapper is a great alternative when fresh options are unavailable. Thanks to modern flash-freezing techniques, frozen fish can retain much of its original texture and flavor, making it a convenient and budget-friendly option.
Pros of Frozen Red Snapper
- Longer shelf life – Properly frozen red snapper can last for several months without losing quality, making it a great option for meal planning.
- More widely available – Frozen red snapper is easier to find year-round in grocery stores, even in areas far from the coast.
- Comparable quality – High-quality frozen snapper, especially if it was flash-frozen immediately after being caught, can taste just as fresh when thawed properly.
- Cost-effective – Frozen fish is often more affordable than fresh, making it a great option for budget-conscious cooks.
Cons of Frozen Red Snapper
- Requires thawing – Frozen fillets need to be properly thawed before cooking to avoid excess moisture and ensure even seasoning.
- Potential texture changes – If frozen improperly or thawed too quickly, the texture of the fish can become slightly mushy.
- Possible freezer burn – If not stored correctly, frozen fish may develop freezer burn, which can impact taste and texture.
Tips for Choosing the Best Red Snapper (Fresh or Frozen)
For Fresh Red Snapper:
- Look for clear, bright eyes if buying whole fish – cloudy eyes indicate age.
- The skin should be shiny and moist, with a vibrant red-pink color.
- The flesh should feel firm and slightly springy when pressed.
- There should be no strong fishy odor—fresh fish smells like the ocean.
For Frozen Red Snapper:
- Choose fillets that are individually vacuum-sealed to prevent freezer burn.
- Look for packages with no ice crystals inside, as this may indicate thawing and refreezing.
- If possible, buy wild-caught red snapper for the best taste and texture.
- Thaw the fish properly by placing it in the refrigerator for a few hours or overnight rather than using warm water, which can degrade the texture.
Final Thoughts
Both fresh and frozen red snapper can work well for a Pan-Fried Blackened Red Snapper Recipe, but your choice depends on availability, budget, and convenience. If you can find fresh, high-quality red snapper, it’s always a great option for optimal taste and texture. However, frozen fillets can be just as delicious when thawed properly and are often more accessible. Either way, choosing the best-quality fillets will ensure your blackened red snapper turns out flavorful, crispy, and perfectly cooked!
Blackened Seasoning Blend – Paprika, Garlic Powder, Cayenne Pepper, and More
A blackened seasoning blend is the heart of the signature flavor that makes dishes like Pan-Fried Blackened Red Snapper so irresistibly delicious. This spice mix, often associated with Cajun and Creole cooking, brings a robust combination of smoky, spicy, and savory flavors that perfectly complement the tender, flaky fish. While recipes can vary slightly, there are some core ingredients that are typically included in a classic blackened seasoning blend, each adding a unique layer of flavor to the dish.
1. Paprika: The Smoky Base
Paprika is one of the key ingredients in blackened seasoning, and it forms the smoky base of the mix. Depending on the type of paprika used, it can bring either a mild sweetness or a deeper, smoky flavor. Smoked paprika, in particular, is popular in blackened seasoning because it adds a rich smokiness that mimics the charred crust created when pan-frying the fish at high heat. This spice is not just for flavor – it also imparts a beautiful deep red color to the fish, enhancing its visual appeal.
2. Garlic Powder: Savory Depth
Garlic powder is another essential component of blackened seasoning, contributing a savory depth that rounds out the flavors. Unlike fresh garlic, which can be sharp and pungent, garlic powder has a milder, more balanced flavor, making it perfect for seasoning blends. The presence of garlic powder brings a subtle richness to the seasoning, complementing the smokiness of paprika and the heat from the cayenne pepper. It also helps create a deliciously aromatic scent when the fish cooks.
3. Cayenne Pepper: The Heat
Cayenne pepper is what gives blackened seasoning its signature heat. This fiery spice adds an inviting spiciness without overwhelming the other flavors in the blend. When you use cayenne pepper in blackened seasoning, it creates a warm, tingly heat that enhances the taste of the fish without making it too spicy for most people. You can adjust the amount of cayenne depending on your spice tolerance – if you prefer a milder seasoning, reduce the amount, but if you like heat, feel free to add a bit more.
4. Onion Powder: Savory Sweetness
Onion powder is often included in blackened seasoning for its savory sweetness. It complements garlic powder but adds a touch of mild sweetness and earthiness to the blend. This ingredient works in harmony with paprika and cayenne pepper, ensuring that the heat and smokiness are balanced with a full, rounded flavor profile.
5. Dried Thyme and Oregano: Herbal Notes
Many blackened seasoning recipes also include dried thyme and oregano, two herbs that bring earthy, slightly floral notes to the mix. These herbs are characteristic of Cajun and Creole flavors, giving the seasoning a herbal complexity that balances the heat and smoky richness. Thyme pairs wonderfully with the other spices, providing a hint of earthiness, while oregano introduces a touch of brightness.
6. Salt and Black Pepper: Essential Seasoning
No seasoning blend is complete without salt and black pepper, which are fundamental for bringing out the natural flavors of the fish and other spices. The salt helps the seasoning adhere to the fish and creates that salty-crusted exterior that is so beloved in blackened recipes. The black pepper adds a subtle sharpness that complements the other ingredients, enhancing the overall flavor without overwhelming the dish.
7. Optional Additions: Cumin, Chili Powder, and More
While the ingredients listed above are standard in most blackened seasoning blends, some cooks like to add a personal touch with a few optional ingredients. Cumin brings a warm, slightly nutty flavor, while chili powder can introduce additional complexity and depth. A pinch of brown sugar can also be added to give a hint of sweetness, helping to balance out the heat and providing a perfect contrast to the savory seasonings.
How Blackened Seasoning Works
The magic of blackened seasoning lies in its application and cooking method. The spices, particularly paprika and cayenne, caramelize and char when the fish is cooked at a high temperature, forming a crispy, flavorful crust on the outside while keeping the fish moist and tender on the inside. This blackening process is what gives the dish its name and is essential to the flavor and texture of Pan-Fried Blackened Red Snapper.
By adjusting the proportions of these spices and customizing the mix to your taste, you can create a blackened seasoning blend that perfectly suits your personal preferences. Whether you like it spicier, smokier, or more savory, this seasoning is incredibly versatile and can be used on a variety of fish and other meats as well.
Cooking Fats – Choosing Between Butter, Olive Oil, or Ghee
When preparing a Pan-Fried Blackened Red Snapper Recipe, the choice of cooking fat plays a significant role in both the flavor and texture of the dish. While the blackened seasoning is the star of the show, the fat you use for cooking affects the crispiness of the fish, the richness of the flavor, and the overall cooking experience. In this section, we’ll explore the benefits and characteristics of three popular cooking fats: butter, olive oil, and ghee, helping you make an informed decision based on your personal preferences and desired outcome.
Butter: Richness and Flavor
Butter is a classic fat choice for blackening fish, adding a rich, creamy flavor that pairs beautifully with the bold spices of blackened seasoning. When heated, butter creates a wonderful golden crust on the fish, thanks to its milk solids, which caramelize and brown during the high-heat cooking process. This browning effect, known as Maillard reaction, helps develop a deep, nutty flavor that enhances the overall dish.
- Flavor: Butter provides a rich, indulgent flavor that balances the heat of the cayenne pepper in the seasoning. It’s particularly great for complementing the delicate sweetness of the red snapper.
- Texture: As it cooks, butter helps create a crisp exterior on the fish, which contrasts with the tender, flaky interior. However, butter can burn at high temperatures, so it’s important to cook it at a moderate heat or consider blending it with another fat.
- Best Use: Butter is ideal for those who are looking for a classic, decadent taste and want to add an extra layer of flavor to their blackened red snapper.
Olive Oil: Healthier and Versatile
Olive oil is a healthier fat alternative that offers a lighter, fruity flavor compared to butter. It has a higher smoke point, which makes it less likely to burn when cooking at high temperatures, making it an excellent choice for pan-frying. Olive oil is also packed with monounsaturated fats, which provide heart-healthy benefits. Extra virgin olive oil, with its more robust flavor, adds a layer of richness without overpowering the dish.
- Flavor: Olive oil contributes a more neutral, slightly peppery flavor, allowing the spices of the blackened seasoning to shine through. For a more intense olive taste, opt for extra virgin olive oil, which is less processed and retains more of the natural olive flavors.
- Texture: Olive oil ensures a crispy, golden exterior without the risk of burning, and it does not coat the fish as heavily as butter, so it results in a lighter, less greasy finish.
- Best Use: Olive oil is perfect for those who want a healthier fat option while still maintaining the crispy texture and well-balanced flavor of their blackened fish. It’s also a good choice for those cooking in warmer climates, where olive oil is a pantry staple.
Ghee: High-Heat Cooking and Nutty Flavor
✅ Ghee, or clarified butter, is a traditional cooking fat that originated in Indian cuisine. Ghee is made by simmering butter to remove the water and milk solids, leaving behind pure butterfat. This makes ghee an excellent option for high-heat cooking as it has a high smoke point (around 450°F), making it ideal for searing and frying without the risk of burning. The flavor profile of ghee is also distinctly nutty and rich, giving it a unique depth that enhances the overall taste of the dish.
- Flavor: Ghee has a nutty, slightly caramelized flavor due to the milk solids that caramelize and brown during the clarification process. This gives your blackened red snapper an additional layer of complexity, offering a slightly toasted flavor that complements the smoky spices in the seasoning.
- Texture: Ghee provides a crispy, golden crust on the fish without the risk of it burning, and it helps create a smooth, rich mouthfeel. Its high fat content also ensures that the fish remains moist while developing a beautifully crisp exterior.
- Best Use: Ghee is ideal for those seeking a rich, indulgent flavor with a slightly nutty twist. It’s also great for those cooking at high temperatures, especially when using a cast-iron skillet, as it can withstand intense heat without breaking down.
How to Choose the Best Cooking Fat for Your Blackened Red Snapper
Choosing the right cooking fat ultimately depends on your flavor preference, dietary goals, and the desired outcome for the dish. Here are some key points to help you decide:
- For a classic, rich flavor with indulgent results, butter is the best choice. It’s ideal for those who want a decadent, creamy crust and enjoy the richness of butter’s natural flavor.
- For a healthier, lighter option with a more neutral flavor, olive oil is the go-to fat. It provides the benefit of heart-healthy fats and ensures a crispy finish without overpowering the other elements of the dish.
- For high-heat cooking and a nutty, rich flavor, ghee is a fantastic option. It offers the best of both worlds, combining the flavor of butter with a higher smoke point, perfect for searing at high temperatures.
Ultimately, all three cooking fats – butter, olive oil, and ghee – bring their own unique qualities to the table. Experiment with each to discover the one that best suits your taste and dietary preferences. Whichever fat you choose, it will work together with the blackened seasoning and red snapper to create a deliciously crispy, flavorful fish that’s sure to impress.
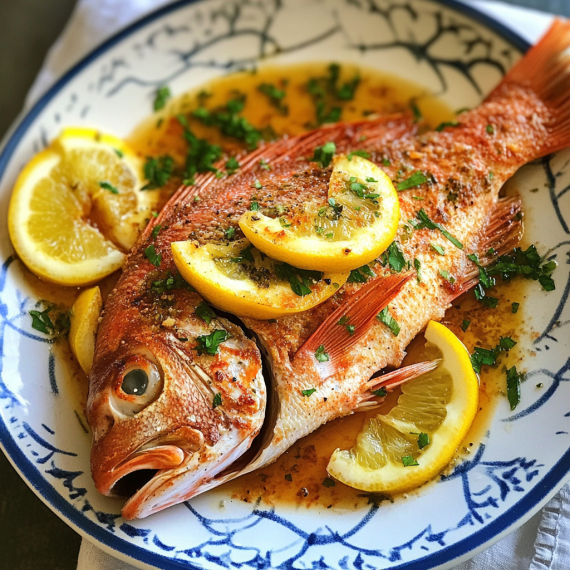
Garnishes & Sides – Lemon Wedges, Fresh Herbs, and Best Accompaniments
The final touch to a Pan-Fried Blackened Red Snapper Recipe lies in the garnishes and sides you choose to serve alongside it. The right accompaniments can elevate the flavors of the dish and balance the bold, smoky heat from the blackened seasoning, providing a refreshing contrast and adding complexity to your meal. In this section, we’ll explore some of the best garnishes and side dishes that pair beautifully with blackened red snapper, helping you create a well-rounded, satisfying meal.
Lemon Wedges: Bright, Citrusy Refreshment
One of the simplest yet most effective garnishes for blackened red snapper is a fresh lemon wedge. The citrus tang of the lemon works wonders in cutting through the richness of the fish and the spiciness of the blackened seasoning. A quick squeeze of lemon over the fish just before eating provides a burst of zesty freshness, brightening up each bite.
- Flavor balance: The acidity of the lemon helps to balance the richness of the fish, offering a refreshing contrast to the smoky, savory flavors of the blackening spice.
- Visual appeal: Lemon wedges add a vibrant pop of color to the plate, making your dish more visually enticing.
- Additional uses: You can also use lemon zest for an extra burst of fragrant citrus aroma that enhances the overall sensory experience.
Lemon wedges are a classic garnish that never fails to complement the depth of flavor in blackened red snapper, making them a perfect addition to your dish.
Fresh Herbs: Enhancing Aroma and Flavor
Fresh herbs are an excellent way to bring a touch of greenery and herbaceous aroma to your dish. They provide an aromatic and flavorful contrast to the rich, bold profile of the blackened red snapper. Popular herb choices include parsley, cilantro, and thyme, each adding its own unique note to the dish.
- Parsley: This mild, slightly peppery herb is one of the most common garnishes for blackened fish. Its bright, fresh flavor helps balance the heat of the seasoning while adding a pop of color.
- Cilantro: For those who enjoy a bit more citrusy zest, cilantro offers a vibrant, herbaceous kick that complements the smoky, savory elements of the blackened seasoning.
- Thyme: For a more earthy touch, fresh thyme pairs beautifully with red snapper, enhancing its flavor profile without overpowering the spices.
When using herbs as garnishes, consider finely chopping them and sprinkling them over the fish just before serving for a burst of freshness that will brighten up the dish and add aromatic appeal.
Best Side Dishes to Serve with Blackened Red Snapper
While lemon wedges and fresh herbs are the perfect way to complement and brighten your blackened red snapper, the right sides can turn your meal into a complete feast. Here are a few ideas for delicious sides that pair beautifully with the bold flavors of the fish:
1. Grilled Vegetables:
Grilled or roasted vegetables are a fantastic side dish that pairs well with the richness of the fish. Vegetables like asparagus, zucchini, bell peppers, and corn on the cob bring a smoky, charred flavor that complements the blackened seasoning while adding texture and freshness.
- Why it works: The smoky flavor of grilled vegetables echoes the charred notes in the blackened red snapper, creating a harmonious balance between the two elements.
2. Rice Dishes:
A simple rice dish serves as an excellent base for blackened red snapper, providing a mild, fluffy contrast to the spicy fish. Whether it’s a basic white rice, coconut rice, or a flavorful dirty rice, rice helps to soak up the seasoning and offers a satisfying complement to the dish.
- Why it works: Rice is neutral and versatile, absorbing the delicious flavors from the fish and the seasoning without overpowering the meal. Coconut rice adds a hint of sweetness, balancing the heat from the seasoning.
3. Coleslaw:
A crunchy, tangy coleslaw can help cut through the spiciness of the blackened fish while adding a cool, creamy contrast. A simple coleslaw made with cabbage, carrots, and a tangy vinaigrette or creamy dressing complements the flavors of the fish without overwhelming it.
- Why it works: The crisp, refreshing nature of the slaw provides a textural contrast to the crispy fish, while the acidity and sweetness help balance the heat from the blackening seasoning.
4. Mashed Potatoes:
For a rich, comforting side dish, creamy mashed potatoes are always a crowd-pleaser. The velvety smoothness of mashed potatoes pairs perfectly with the crunchy exterior of the blackened fish, and their neutral flavor offers a wonderful counterpoint to the boldness of the seasoning.
- Why it works: The richness of the mashed potatoes acts as a soothing contrast to the spiciness of the fish, while still allowing the fish’s flavors to shine through.
5. Cornbread:
If you’re aiming for a more southern-inspired meal, cornbread is an excellent side dish. Its slightly sweet flavor and crumbly texture provide the perfect contrast to the spicy blackened fish, while still maintaining a comforting, hearty presence on the plate.
- Why it works: The slightly sweet cornbread complements the savory, spicy fish and provides a satisfying, fluffy texture that balances the dish.
Conclusion: Balancing the Bold Flavors
The right garnishes and sides can elevate your Red Snapper Recipe from a delicious meal to an unforgettable dining experience. Lemon wedges and fresh herbs add freshness and brightness, while sides like grilled vegetables, rice dishes, and creamy mashed potatoes provide texture and balance. By pairing these garnishes and sides thoughtfully, you can create a well-rounded and satisfying meal that highlights the bold, smoky flavors of the red snapper recipe while offering a delicious contrast.
Step-by-Step Guide to Cooking This Blackened Red Snapper Recipe
How to Prepare Red Snapper for the Perfect Blackened Recipe
Preparing your red snapper correctly is essential to achieving the perfect pan-fried blackened red snapper recipe. Proper preparation ensures the fish cooks evenly, allowing the bold, smoky flavor of the blackened seasoning to shine through. In this section, we’ll walk you through the key steps to prepare your red snapper fillets so they are ready for that deliciously crispy, golden-blackened crust. Here’s how to get your fish ready for the pan:
1. Choosing the Right Red Snapper Fillets
Before diving into preparation, it’s essential to select high-quality red snapper. Freshness is key when it comes to fish, so look for bright, clear eyes and firm, moist flesh that doesn’t smell fishy. If you’re purchasing whole fish, it’s best to have it filleted by the fishmonger, or you can purchase pre-cut red snapper fillets.
Fresh vs. Frozen: While fresh fillets are always preferred for optimal texture and flavor, frozen red snapper can also work in a pinch. Just be sure to thaw the fish completely before preparation and pat it dry to remove any excess moisture.
- Tip: If you’re using frozen fish, make sure it is properly thawed by placing it in the refrigerator overnight or under cold running water for a quicker thaw.
2. Thawing and Drying the Fish
For frozen red snapper, the first step in preparing it for the blackened recipe is to ensure it’s completely thawed. Thawing the fish properly ensures even cooking. Once thawed, use a paper towel to gently blot the fillets dry. This is an important step because excess moisture on the fish can interfere with achieving a crispy, blackened crust.
Why dryness matters: The key to the blackened crust is a dry surface. When you apply the blackened seasoning, the dry fillet allows the spices to adhere better, creating that crispy, flavorful layer. If there is too much moisture, the seasoning will not stick properly, and you might not get the desired blackened effect.
3. Removing the Skin (Optional)
While red snapper skin is edible and can be left on if desired, for the blackened recipe, many people prefer to remove it for a crispier texture and to better allow the seasoning to penetrate the fish. If you choose to remove the skin, make sure to do so carefully using a sharp fillet knife.
- How to remove the skin: Starting from the tail end of the fillet, gently slide the knife between the flesh and the skin, angling it slightly downward. Pull the skin as you cut, ensuring you don’t lose too much flesh.
Removing the skin may give the fish a cleaner appearance, and it ensures that the seasoning is the primary flavor profile, allowing the spices to stand out more.
4. Cutting the Fillets into Portions (Optional)
If your fillets are large, you may want to cut them into smaller portions for easier cooking and serving. Cutting into smaller pieces also helps the fish cook more evenly and allows for more surface area to be coated in seasoning.
- Tip: Aim for portions that are about 4-6 ounces each. This size ensures that the fish will cook evenly and creates a perfect balance of seasoning in every bite.
5. Seasoning the Fish
Once your red snapper fillets are properly prepped, it’s time to season them for the blackened effect. First, lightly coat the fillets with oil (vegetable oil, olive oil, or ghee) to help the seasoning adhere. Then, generously sprinkle the blackened seasoning blend over both sides of the fillets.
- Tip: Press the seasoning into the fish gently, ensuring that it coats the fillets evenly, and you get that bold, flavorful crust when cooked.
Remember, the blackened seasoning is what gives the fish its signature flavor, so don’t be afraid to apply it liberally. If you prefer extra heat, feel free to adjust the cayenne pepper to your desired level of spiciness.
6. Letting the Seasoning Set
Once the fillets are seasoned, allow them to sit for about 5-10 minutes before cooking. This gives the seasoning a chance to set into the fish and allows the flavors to absorb, making the final dish even more flavorful.
- Why this step matters: Allowing the seasoning to set also helps in achieving that perfect blackened crust, as the seasoning will form a better bond with the fish during the cooking process.
7. Preparing Your Cooking Surface
Now that your fillets are perfectly prepared, it’s time to get the cooking surface ready. For the perfect blackened effect, use a cast-iron skillet or a heavy-bottomed pan. These types of pans retain heat well and can get extremely hot, which is essential for developing that crispy, smoky crust on the red snapper.
- Tip: Heat the skillet over medium-high heat for several minutes before adding your cooking fat, ensuring it’s hot enough for a perfect sear. You can add a little oil or ghee to the pan to prevent sticking and to help the fish crisp up.
Conclusion
Properly preparing your red snapper fillets is essential for the perfect blackened red snapper recipe. From selecting the freshest fish and ensuring it’s properly thawed and dried, to applying a generous coating of seasoning, these steps all play a crucial role in achieving a crispy, flavorful crust. By following these preparation tips, you’ll be on your way to making a mouthwatering blackened red snapper that’s perfectly seasoned and cooked to perfection.
The Best Way to Pan-Fry Red Snapper for a Crispy Crust
Achieving the perfect crispy crust on your pan-fried red snapper is the key to a successful blackened red snapper recipe. Pan-frying allows you to develop a beautifully charred and crispy exterior, which contrasts perfectly with the tender, moist fish inside. Here’s a step-by-step guide to help you achieve the ultimate crispy crust while ensuring your fish stays perfectly cooked.
1. Preheat the Pan Properly
The first step to achieving a crispy crust is making sure your pan is hot enough. For the best results, use a cast-iron skillet or a heavy-bottomed frying pan. These pans retain heat well and provide an even cooking surface, which is crucial for blackening.
How to Preheat the Pan: Heat the skillet over medium-high heat for about 3-5 minutes. The goal is to get the pan very hot without smoking it. A properly preheated pan will sear the red snapper fillets quickly, creating that desired crispy crust.
- Tip: You can test the pan’s readiness by sprinkling a few drops of water onto the surface. If they dance and evaporate immediately, the pan is hot enough for cooking.
2. Choosing the Right Cooking Fat
The fat you choose to cook your red snapper fillets can significantly impact the flavor and texture of the crust. Butter, olive oil, and ghee are all excellent choices, each contributing its own flavor profile.
- Butter: Offers a rich, creamy flavor but tends to burn at high temperatures, so it’s best to combine it with another fat like oil or ghee for a balanced cooking temperature.
- Olive Oil: A great choice for its mild flavor and higher smoke point than butter. It’s perfect for getting a crispy, golden-brown crust.
- Ghee: Ghee has a higher smoke point than butter, making it ideal for frying at high temperatures without burning. It imparts a subtle, nutty flavor that pairs beautifully with blackened seasoning.
How to Apply the Fat: Add 1-2 tablespoons of your chosen fat to the preheated pan. Swirl it around to coat the bottom evenly. Allow the fat to melt and shimmer before adding the fish to ensure it’s hot enough to fry the fillets properly.
3. The Right Temperature for the Fish
For a crispy crust, the fish needs to hit the pan at the right temperature. If the fish is too cold when it hits the pan, the coating can get soggy, and the blackened seasoning might not adhere properly. Conversely, if the fish is too warm or still wet, it will not get a nice sear.
How to Prepare the Fish: After seasoning your red snapper fillets and allowing them to sit for a few minutes, make sure they are at room temperature before placing them in the pan. This ensures even cooking and helps achieve the perfect sear.
- Tip: Pat the fillets dry with a paper towel to remove any moisture that could prevent the crust from forming.
4. Don’t Overcrowd the Pan
Overcrowding the pan is one of the biggest mistakes you can make when frying red snapper. If there are too many fillets in the pan at once, they will steam rather than fry, preventing the development of a crispy crust.
How to Fry the Fish: Work in batches if necessary. Place just 2-3 fillets in the pan at a time, making sure there is enough space around each piece. This allows the heat to circulate evenly, ensuring that the seasoning gets the chance to blacken and form a delicious crust.
- Tip: Keep an eye on the fish while it’s cooking, but avoid moving it around in the pan. Let the fish sear undisturbed for 3-4 minutes on each side, depending on thickness.
5. How Long to Cook the Fish
For the perfect crispy crust, timing is everything. The key to blackened red snapper is to cook it for just the right amount of time to get the crust crispy without overcooking the fish, which can result in a dry texture.
How to Cook the Fillets: After placing the fillets in the hot pan, allow them to cook for 3-4 minutes on the first side. You’ll know the fish is ready to flip when the edges start to turn golden brown and the fish naturally releases from the pan. Use a spatula to gently flip the fillets and cook the other side for another 2-3 minutes.
- Tip: The fillets should be opaque and flaky on the inside when done. You can check for doneness by gently pressing the fish with a fork or using a meat thermometer (the internal temperature should reach 145°F or 63°C).
6. Resting the Fish for the Best Crust
Once your red snapper is cooked to perfection, remove the fillets from the pan and place them on a plate lined with paper towels to absorb any excess oil. Let the fish rest for 1-2 minutes before serving. This resting time allows the fish to finish cooking while the crust stays crispy and intact.
- Tip: If you want to keep the fish warm without compromising the crust, place it in a pre-warmed oven at 200°F (93°C) for a few minutes.
Conclusion
The best way to pan-fry red snapper for a crispy crust is all about temperature control, the right choice of fat, and patience. By preheating your pan, selecting the right oil or butter, and allowing the fish to cook undisturbed, you can achieve a perfectly crispy, blackened crust every time. With these tips, your blackened red snapper recipe will be a hit, bringing bold, smoky flavors to your table.
Pro Tips to Elevate Your Blackened Red Snapper Recipe
Choose the Right Cooking Oil with a High Smoke Point
The first key to preventing excess smoke while cooking blackened red snapper at high heat is selecting the right oil. Each cooking oil has a smoke point, or the temperature at which it begins to break down and produce smoke. Opt for oils with higher smoke points to maintain optimal cooking conditions.
- Best Oil Choices: Oils such as canola oil, avocado oil, and ghee are ideal for high-heat cooking. These oils can withstand the intense heat necessary to create a perfect blackened crust without causing your kitchen to fill with smoke.
2. Preheat the Pan Gradually
Another important tip is to avoid rushing the preheating process. Sudden bursts of heat can lead to burning the oil, resulting in smoke. Gradually heat your pan over 3-5 minutes, bringing it up to the desired cooking temperature without rushing the process.
- How to Preheat: Start with medium heat and slowly increase it to medium-high or high heat. This ensures the oil heats evenly without overheating.
3. Use Proper Ventilation or Cook Outdoors
High-heat cooking produces smoke, so make sure your kitchen is well-ventilated. If you lack a range hood, consider opening windows or even cooking outdoors to keep your kitchen air clean. For those with an outdoor grill, grilling your blackened red snapper can help eliminate smoke indoors.
4. Control Oil Quantity
Excessive oil can create a smoky environment. Instead, use just enough to coat the pan lightly, ensuring the fish sears without burning the oil. You can apply a thin layer using a silicone brush or a paper towel.
5. Monitor Heat While Cooking
Once your red snapper fillets are in the pan, it’s crucial to control the heat. Even with high heat at the start, if the temperature becomes too intense, the oil can burn. Lower the heat slightly if you notice too much smoke, but maintain high enough heat to crisp the fish.
6. Keep Your Kitchen Clean
Grease buildup from previous cooking sessions can contribute to excess smoke. Clean your kitchen regularly, especially the stove, cooking surfaces, and exhaust fan, to prevent oil from burning and producing unnecessary smoke.
7. Avoid Overcrowding the Pan
Overcrowding the pan can lower the temperature and lead to uneven cooking, which causes more smoke. Cook the red snapper fillets in batches if necessary to ensure the fish crisps up perfectly without creating excessive smoke.
How to Get the Perfect Blackened Crust Without Burning
Achieving the perfect blackened crust on your red snapper recipe is all about balancing high heat and precise timing. The blackened effect—characterized by a dark, crispy, flavorful crust—comes from searing the fish in a pan-fried process with a heavy application of seasoning and fat. However, if the heat is too high or the fish is left in the pan too long, the seasoning can burn, creating bitterness instead of the rich, smoky flavor you desire. Here’s how to achieve a perfectly blackened red snapper without burning the crust:
1. Preheat Your Pan Properly
To create the perfect blackened crust, it’s crucial to preheat your pan to a high temperature, but not to the point of overheating. The goal is to reach a temperature high enough to sear the seasoning on the fish quickly without burning it. A cast-iron skillet is the ideal choice for this recipe, as it retains heat well and distributes it evenly.
- Tip: Preheat the pan over medium-high heat for about 3–5 minutes. You can test the temperature by sprinkling a small amount of water into the pan—if it sizzles immediately, the pan is ready.
2. Coat the Fish Generously with Blackened Seasoning
The key to a blackened crust is the seasoning itself. A generous coating of blackened seasoning (made with paprika, garlic powder, onion powder, cayenne, thyme, oregano, and other spices) creates the crispy, flavorful outer layer. However, too little seasoning won’t achieve the desired effect, and too much can cause burning.
- Tip: Pat the red snapper fillets dry with paper towels to ensure the seasoning sticks properly. Then, coat the fish evenly with the blackened seasoning, pressing gently to make sure the fish is fully covered but not caked with excess spices.
3. Use the Right Amount of Oil or Fat
The blackened effect comes from the oil that helps the spices crisp up in the pan. However, you don’t want to use too much oil, as it can cause the seasoning to slide off the fish and result in an oily, soggy crust. The key is to use just enough oil or fat to coat the bottom of the pan and provide a searing surface for the fish.
- Best Oils/Fats for Blackening: Use an oil with a high smoke point, such as ghee or avocado oil, or a mixture of butter and oil. Butter adds rich flavor while oil prevents the butter from burning.
- Tip: Once the pan is preheated, add a tablespoon of oil or fat. Swirl it around to coat the bottom of the pan. Allow it to heat for 1-2 minutes before adding the fish.
4. Don’t Overcrowd the Pan
Overcrowding the pan can lower the temperature, making it difficult to get that crispy, blackened crust. For the best results, cook your red snapper fillets in batches if necessary, ensuring that there is enough room for the fish to sear properly without steaming.
- Tip: Depending on the size of your fillets and your pan, you should aim to cook only 2-3 pieces of red snapper at once. This helps maintain the high temperature necessary for blackening.
5. Watch the Cooking Time Carefully
The perfect blackened crust develops quickly, so timing is key. If you leave the fish in the pan for too long, the seasoning will burn, leaving a bitter taste. The goal is to cook the fish for just the right amount of time to allow the crust to form while ensuring the interior remains moist and tender.
- Tip: Cook the red snapper fillets for about 3-4 minutes per side, depending on thickness. You’ll know the crust is ready when it becomes dark and crispy, but before it starts to smoke excessively or char.
6. Adjust the Heat as Necessary
Throughout the cooking process, you’ll need to keep an eye on the heat. If the pan gets too hot and the seasoning begins to burn, lower the heat slightly. On the other hand, if the crust isn’t forming as desired, you can increase the heat slightly.
- Tip: If the pan starts to smoke too much, it’s an indication that the heat may be too high, and you should reduce the temperature slightly.
7. Let the Fish Rest Before Serving
After removing the red snapper fillets from the pan, let them rest for a couple of minutes. This allows the juices to redistribute, and the crispy, blackened crust will hold its shape without becoming soggy.
- Tip: Resting the fish will also prevent the internal temperature from rising too much, ensuring your fish remains tender and moist.
Conclusion
Achieving the perfect blackened crust on your red snapper requires a combination of high heat, the right seasoning, and careful attention to cooking times. By preheating the pan, using the right amount of seasoning and oil, and controlling the heat, you can create a crispy, flavorful crust without burning the spices. With these tips in mind, you’ll be able to serve up a perfectly blackened red snapper recipe that’s full of flavor and beautifully seared.
Best Side Dishes to Serve with Blackened Red Snapper Recipe
When it comes to pairing the perfect side dishes with blackened red snapper, you want to balance the bold, spicy flavors of the fish with accompaniments that complement, but don’t overpower, its richness. The crisp, smoky crust of the blackened red snapper deserves side dishes that bring out its flavor while adding variety and texture to the meal. Here are some fantastic options that will elevate your red snapper recipe:
1. Creamy Coleslaw
Creamy coleslaw is a classic side dish that pairs wonderfully with the spicy blackened seasoning of the red snapper. The cool, creamy texture of the coleslaw provides a refreshing contrast to the bold, smoky flavor of the fish, helping to mellow out the heat while adding crunch and brightness to the meal.
- Why it works: The creaminess balances the heat, and the crunchiness provides a delightful texture contrast. You can make it with cabbage, carrots, and a tangy dressing made from mayonnaise, vinegar, sugar, and a pinch of salt.
- Variation: For a tangier twist, try a vinegar-based coleslaw or add some jalapeños for extra spice.
2. Roasted Vegetables
Roasted vegetables are another fantastic side that pairs beautifully with blackened red snapper. The natural sweetness of vegetables like carrots, bell peppers, and zucchini, when roasted, pairs well with the bold, savory flavor of the fish. The slight caramelization from roasting enhances the vegetables’ natural sweetness, offering a balance to the spices on the fish.
- Why it works: Roasting intensifies the flavor of the vegetables, which pairs well with the smokiness of the blackened seasoning. Try roasted sweet potatoes, asparagus, or a medley of seasonal vegetables like Brussels sprouts or cauliflower.
- Tip: To add a savory touch, season the vegetables with herbs like rosemary, thyme, or garlic.
3. Garlic Mashed Potatoes
Garlic mashed potatoes are an excellent side dish that provides comfort and richness without overshadowing the blackened red snapper. The creamy, buttery texture of mashed potatoes complements the crispy, spiced crust of the fish. Adding garlic to the mashed potatoes enhances the savory flavor, making them an irresistible accompaniment.
- Why it works: The creamy texture of mashed potatoes balances the heat from the blackened seasoning, and the garlic adds depth of flavor. It’s also a great side for soaking up any leftover juices or seasoning from the fish.
- Variation: Try adding roasted garlic or sour cream for an extra layer of flavor.
4. Corn on the Cob
For a more casual, Southern-inspired meal, corn on the cob is an ideal side. The sweetness of the corn complements the spicy blackened red snapper beautifully, while its natural juiciness adds moisture to the plate. Whether grilled, boiled, or roasted, corn is a flavorful and fun side dish.
- Why it works: The sweetness of corn acts as a perfect counterbalance to the heat of the fish. You can brush it with a little butter, and sprinkle with lime and cilantro for added flavor.
- Variation: Grilled corn with a sprinkle of smoked paprika will enhance the smokiness in the fish, adding a cohesive flavor profile.
5. Rice Pilaf
A simple yet flavorful rice pilaf can be a great accompaniment to blackened red snapper. The subtle flavors of the rice absorb the juices and spices from the fish, creating a harmonious plate. Add some herbs and sautéed onions or garlic to the rice for extra depth and texture.
- Why it works: The rice provides a neutral base to soak up the seasoning and juices from the fish, while the texture adds contrast to the crispy crust of the red snapper.
- Variation: For added flavor, make the pilaf with coconut milk or chicken broth instead of water. You can also toss in some raisins or toasted almonds for a unique twist.
6. Sautéed Greens (Spinach, Kale, or Collard Greens)
Sautéed greens, like spinach, kale, or collard greens, bring a healthy and flavorful touch to your blackened red snapper dish. The greens, cooked lightly with garlic, olive oil, and a squeeze of lemon juice, provide a savory, slightly bitter contrast to the spicy fish.
- Why it works: The earthy flavors of the greens balance out the heat from the blackened seasoning, while the garlic and lemon enhance the overall flavor profile.
- Tip: If you want a more decadent version, sauté the greens in bacon fat or butter for added richness.
7. Fresh Salad with Citrus Dressing
A fresh salad with a light citrus dressing is a refreshing option that helps cut through the richness of the fish. A mix of leafy greens like arugula, spinach, and mixed lettuce, paired with segments of orange or grapefruit, adds both texture and a sweet-tart contrast to the dish.
- Why it works: The citrus dressing, made from lemon, lime, and olive oil, brightens the flavors and provides a refreshing contrast to the heat and richness of the fish.
- Variation: Add avocado, tomatoes, and a handful of coriander or cilantro for added freshness.
8. Hushpuppies
For an authentic Southern twist, hushpuppies are the perfect side to serve alongside your blackened red snapper. These deep-fried cornmeal balls are crispy on the outside and tender on the inside, adding a delightful crunch and comfort to your meal.
- Why it works: The crunchy, savory flavor of the hushpuppies pairs well with the spiciness of the blackened red snapper, and they bring an additional Southern flair to the dish.
- Tip: Serve with a side of remoulade sauce or spicy ketchup for dipping.
Conclusion
Choosing the right sides for your blackened red snapper recipe can elevate your meal and create a well-rounded, satisfying experience. Whether you opt for creamy sides like mashed potatoes or coleslaw, or prefer something lighter like a citrus salad or roasted vegetables, each of these dishes enhances the bold, smoky flavor of the blackened fish. Pairing the right sides ensures a delightful contrast of textures and flavors that complement the fish and take your meal to the next level.
FAQs About Cooking Red Snapper Recipe
Can I Use Another Fish for This Recipe?
While red snapper is the ideal choice for this blackened fish recipe due to its firm texture, mild flavor, and ability to hold up well to the intense heat of pan-frying, it’s not the only fish that can be used. If red snapper is unavailable or if you’re looking to try something new, there are several alternative fish options that work just as well with the blackened seasoning method.
1. Grouper
Grouper is an excellent alternative to red snapper for blackened fish recipes. Like red snapper, grouper has a mild, slightly sweet flavor with a firm texture that holds up well during cooking. It also has a dense flesh that won’t break apart under high heat, which makes it a great choice for pan-frying. Grouper’s subtle flavor allows the blackened seasoning to shine, providing that perfect balance of spice and savory goodness.
- Why it works: The firm texture and mild flavor make grouper a great substitution, ensuring the seasoning sticks well to the fish without overpowering its natural taste.
- Cooking tip: Similar to red snapper, grouper should be cooked at a high temperature to achieve that signature crispy, blackened crust.
2. Tilapia
Tilapia is another popular alternative that can be used in place of red snapper for blackened fish. Although tilapia has a softer, flakier texture, it still works well with bold seasonings. Its neutral flavor allows the blackened seasoning to truly stand out. When cooked properly, tilapia can develop a lovely crispy crust on the outside, while staying tender inside.
- Why it works: Its mild flavor and wide availability make tilapia an easy-to-find substitute. While it’s flakier than red snapper, it still absorbs the blackened spices effectively.
- Cooking tip: Be mindful not to overcook tilapia, as it can become dry due to its more delicate texture.
3. Mahi-Mahi
Mahi-mahi, also known as dolphin fish, is another great option for this recipe. With its slightly sweet flavor and firm, steak-like texture, mahi-mahi holds up beautifully when blackened. The fish cooks to a perfect crispness on the outside while remaining juicy on the inside. Its flavor pairs wonderfully with Cajun seasoning, making it a fantastic choice for those who want a bit more of a “meaty” fish experience.
- Why it works: Mahi-mahi has a dense, firm texture similar to red snapper, which ensures the seasoning adheres well and doesn’t overwhelm the fish.
- Cooking tip: Because mahi-mahi can be thicker than red snapper, you may need to cook it a little longer to ensure it’s cooked through while keeping that blackened crust intact.
4. Catfish
Catfish is a Southern classic and an ideal candidate for blackened fish dishes. Known for its slightly sweet flavor and tender, flaky texture, catfish works well with a robust blackened seasoning. It holds up well under high heat and is widely accessible. Its mild flavor allows the spices to shine through without being overpowering.
- Why it works: Catfish’s mild sweetness and firm texture make it a good choice for blackening, providing a satisfying contrast to the spiciness of the seasoning.
- Cooking tip: Since catfish is more delicate than red snapper, be gentle when flipping it to avoid breaking the fillets.
5. Snapper Varieties (Yellowtail, Lane Snapper, etc.)
If you’re a fan of red snapper, you can try using other snapper varieties such as yellowtail snapper or lane snapper. These fish share similar characteristics, including a mild flavor and firm texture, making them perfect for blackened recipes. Their taste profile complements the spices in the seasoning while providing a slightly different twist on the classic dish.
- Why it works: The similar flavor and texture to red snapper mean these varieties will take to the blackening technique well.
- Cooking tip: These snappers have a similar density to red snapper, so you can use the same cooking techniques for optimal results.
6. Swordfish
Swordfish is a rich, meaty fish that can also be used in place of red snapper. With its steak-like texture, it holds up beautifully to pan-frying and the intense heat required for blackening. Swordfish has a stronger, slightly sweet flavor that complements the boldness of the blackened seasoning.
- Why it works: The firm, steak-like texture of swordfish makes it an excellent candidate for blackening, allowing the seasoning to create a beautiful crust without the fish falling apart.
- Cooking tip: Swordfish steaks tend to be thicker, so be sure to adjust the cooking time accordingly to ensure they cook through without burning the crust.
Conclusion
While red snapper is an ideal choice for this blackened fish recipe, many other types of fish can deliver equally delicious results. Fish like grouper, tilapia, mahi-mahi, and catfish all bring unique textures and flavors to the dish, allowing you to experiment with the recipe depending on availability and personal preference. The key is to select a fish that has a mild flavor and firm texture, as this will ensure the blackened seasoning sticks well and the fish cooks evenly, providing a satisfying meal every time.
What’s the Difference Between Blackened and Grilled Red Snapper?
When it comes to cooking red snapper, two of the most popular methods are blackening and grilling. While both techniques offer delicious results, they produce distinctly different flavors, textures, and cooking experiences. Understanding the differences between these two methods can help you choose the one that best fits your flavor preferences and cooking style.
1. Cooking Method – High Heat vs. Direct Flame
The primary difference between blackened and grilled red snapper lies in the cooking method and the heat source used.
- Blackened Red Snapper: The process of blackening involves cooking the fish in a hot cast-iron skillet with a generous amount of blackened seasoning. The fish is coated in a spice blend that typically includes paprika, cayenne pepper, garlic powder, and thyme. The skillet is preheated to a high temperature, and the fish is seared quickly on both sides, creating a flavorful, crispy crust. Blackening is a dry cooking method that focuses on using high, direct heat to sear the fish, which leads to the formation of the characteristic dark, flavorful crust.
- Grilled Red Snapper: Grilling, on the other hand, involves cooking the fish over an open flame or on a grill grate. The fish is typically seasoned or marinated, then placed directly on the grill. Grilling imparts a smoky flavor to the fish and allows it to cook more gently over the heat. While the fish’s surface may get a nice char from the flames, grilling doesn’t produce the same blackened crust that the skillet method does.
2. Flavor Profile – Spices and Smoke
The flavor profiles of blackened and grilled red snapper are also distinct due to the cooking techniques and seasonings used.
- Blackened Red Snapper: The blackened seasoning used in the pan-frying process creates a bold, smoky, and spicy flavor. The combination of paprika, cayenne, garlic, and other spices results in a strong, vibrant taste that can be intense, especially if the seasoning is used generously. The high heat of the pan further intensifies the flavors by slightly charring the spice mix, resulting in a crispy and flavorful exterior while keeping the fish moist and tender inside.
- Grilled Red Snapper: Grilled red snapper offers a more subtle, smoky flavor due to the open flames and the grilling process. The flavor of the fish is enhanced by the natural smokiness from the charcoal or wood, which adds depth to the fish’s taste without overpowering it. The seasoning for grilled fish is often lighter, allowing the natural flavor of the snapper to shine through. The high heat from the grill can also create delicious grill marks and a slightly caramelized exterior, but the fish is less spicy compared to blackened red snapper.
3. Texture – Crispy vs. Flaky
The texture of the finished dish is another key difference between blackened and grilled red snapper.
- Blackened Red Snapper: When blackening, the fish develops a crispy, caramelized crust on the outside due to the intense heat of the cast-iron skillet. The high heat locks in the moisture inside the fillets, creating a moist and tender interior. The result is a contrast between the crispy exterior and the soft, juicy fish inside, which makes it a popular method for those who enjoy a crunchy texture alongside a tender bite.
- Grilled Red Snapper: Grilled red snapper tends to have a flaky texture due to the more gentle cooking process. The fish is typically cooked over lower heat compared to blackening, which means it is less likely to develop a crispy crust. Instead, the exterior can become slightly crispy and golden from the grill, while the inside remains flaky and tender. The grilling method preserves the natural moisture in the fish without sealing the edges into a hard crust, making it ideal for those who enjoy a lighter, flakier texture.
4. Health Considerations – Fat Content and Cooking Medium
The health aspects of both cooking methods can differ, depending on how the fish is prepared.
- Blackened Red Snapper: Since blackened red snapper is cooked with a significant amount of butter or oil in a hot pan, the dish tends to have a higher fat content compared to grilled fish. The fats used in blackening can help the fish cook evenly and create that delicious crispy crust, but they also increase the overall calorie count of the dish. If you’re looking to reduce the fat content, using olive oil or ghee as a cooking fat may be a better option.
- Grilled Red Snapper: Grilling tends to be a healthier cooking method since it doesn’t require the use of added fats or oils (though some light marinating or brushing with oil may be used). The fish is cooked over an open flame, allowing excess fats to drip off the fish, which reduces its overall calorie content. Grilled red snapper is therefore often considered a leaner option compared to blackened red snapper, especially if it’s cooked without heavy marinades.
5. Cooking Time and Difficulty – Quick and Intense vs. Steady and Balanced
The cooking time and ease of preparation also differ between the two methods.
- Blackened Red Snapper: Blackening requires a bit more attention to detail as the fish is cooked at very high temperatures in a cast-iron skillet. It’s a fast cooking process, usually taking only 3-4 minutes per side, but the heat and the need to monitor the seasoning closely can make it more challenging for beginners. Additionally, blackened fish requires careful handling to avoid burning the spices or overcooking the delicate fish.
- Grilled Red Snapper: Grilling red snapper is generally a more forgiving method, with a slightly longer cooking time, usually around 6-8 minutes per side, depending on the thickness of the fillets. The grill offers a more hands-off approach, allowing you to cook multiple pieces of fish at once without much attention needed. It’s a great method for cooking fish if you’re looking for a relaxed, flavorful meal without the need for precise timing.
Conclusion
Both blackened and grilled red snapper are delicious ways to enjoy this versatile fish, but the final choice will depend on your flavor preference, texture desires, and cooking style. Blackened red snapper offers a crispy, bold, and intensely seasoned crust with a moist and tender interior, ideal for those who enjoy robust, spicy flavors. On the other hand, grilled red snapper brings out the fish’s natural flavors with a smoky, subtle char and a lighter, flakier texture. Whether you choose blackened or grilled, both methods will give you a fantastic dish that highlights the best qualities of this beautiful fish.
How Do I Store and Reheat Leftovers?
When you’ve cooked a delicious batch of blackened red snapper and have some leftovers, you want to make sure you store and reheat it properly to maintain its flavor, texture, and freshness. Fish, especially red snapper, is delicate, so proper storage is essential to keep it safe and tasty for later consumption.
1. Storing Leftover Blackened Red Snapper
Properly storing leftover blackened red snapper will help preserve its quality for a few days. Here’s how to do it:
- Cool it Down: First, allow the leftover fish to cool down to room temperature. However, avoid leaving it out for more than two hours to prevent bacterial growth. After it has cooled, transfer the fish to an airtight container.
- Use an Airtight Container: Place the fish in an airtight container to avoid any moisture loss or absorption of other odors in the fridge. If you don’t have an airtight container, wrap the fish tightly in plastic wrap or aluminum foil and then place it in a resealable plastic bag or another storage container.
- Refrigerate Promptly: Store the blackened red snapper in the refrigerator at or below 40°F (4°C) and use it within 2-3 days for the best taste and safety. The shorter the storage time, the better the quality of the fish.
- Freezing Leftovers: While it’s best to consume fish within a few days, if you have more leftovers than you can eat, freezing is an option. Wrap the fish tightly in plastic wrap and aluminum foil, or store it in a vacuum-sealed bag. Frozen fish can last for up to 2-3 months. Keep in mind that freezing can slightly alter the texture of the fish, especially the crispy crust.
2. Reheating Leftover Blackened Red Snapper
Reheating leftover blackened red snapper requires a little attention to detail to ensure that it doesn’t lose its flavor or become too dry. The goal is to preserve the crispy crust while ensuring the fish remains moist inside.
Best Reheating Methods
- In the Oven: The best way to reheat blackened red snapper is in the oven, as it can help keep the fish’s crust crispy without drying it out. Preheat your oven to 350°F (175°C). Place the fish on a baking sheet lined with parchment paper or aluminum foil. Cover it loosely with foil to prevent it from over-drying, and bake it for about 10-12 minutes or until it’s heated through. If you want to maintain the crispy crust, remove the foil during the last few minutes of reheating.
- In a Skillet: If you want to quickly reheat your fish and maintain its crispy texture, a skillet is a great option. Heat a little bit of oil or butter in a pan over medium heat. Once the oil is hot, place the fish in the pan and cook it for about 2-3 minutes on each side. This method will help revive the crispy crust and ensure the fish is heated evenly.
- Microwave: While the microwave is the quickest method, it tends to make the fish less crispy and can cause it to become rubbery if overheated. If you’re in a hurry, place the fish on a microwave-safe plate, cover it with a damp paper towel (to prevent drying out), and microwave in short 20-30 second intervals until heated through. To avoid overcooking, check the fish frequently.
Reheating Tips to Maintain Quality:
- Add Moisture: If the fish has become a bit dry in storage, you can add a drizzle of butter or a squeeze of lemon juice to help bring back moisture when reheating.
- Avoid Overheating: Overheating fish can cause it to become tough and dry, so always check the temperature before serving. Reheat it until it’s just warm throughout, not piping hot, to preserve its tenderness.
3. How Long Can I Keep Leftovers?
As mentioned earlier, blackened red snapper should be eaten within 2-3 days when stored properly in the refrigerator. While it can be frozen for longer storage, the texture and flavor may degrade over time. To ensure the best experience, it’s recommended to eat leftovers soon after storing, as fish does not hold up well to extended freezing or refrigeration.
4. Can You Reheat Blackened Fish More Than Once?
It’s not ideal to reheat blackened red snapper more than once. Each time you reheat fish, its moisture and texture can degrade, making it dry and less flavorful. If you have too many leftovers, it’s better to enjoy them the first time and avoid reheating them multiple times. You can always repurpose the leftover fish into a new dish, like a fish taco or a seafood salad, to help use up any remaining portions.
Conclusion
To store and reheat your Red Snapper Recipe properly, remember to cool it, store it in an airtight container, and refrigerate it immediately. When reheating, the oven or skillet is the best method for maintaining the fish’s crispy crust and moisture. Avoid reheating more than once to ensure the best flavor and texture. With these tips, you can enjoy your leftover red snapper recipe while keeping it fresh, tasty, and safe!
note ;
For a simple yet delicious take on Pan-Fried Blackened Red Snapper, check out this recipe from AllRecipes. It’s packed with bold flavors and easy to follow! Pan-Fried Blackened Red Snapper Recipe
Conclusion
In conclusion, the Pan-Fried Blackened Red Snapper Recipe offers a delicious combination of bold flavors and a crispy, flavorful crust, thanks to the aromatic blackened seasoning. The rich spices and the perfect cooking method make it a standout dish that’s both easy to prepare and satisfying to eat. Whether you’re a fan of Cajun cuisine or just love trying new ways to prepare seafood, this recipe will quickly become a favorite in your culinary repertoire.
With its versatility, this dish pairs wonderfully with a variety of sides, from fresh salads to hearty grains. The smoky, spicy notes of the fish are sure to delight your taste buds and leave everyone at the table craving more.
I encourage you to give this blackened red snapper a try the next time you want to impress your friends or family with a flavorful, restaurant-quality meal at home. Don’t forget to share your experiences in the comments below — I’d love to hear how it turned out for you, any modifications you made, or any questions you have! Happy cooking!